
15 Small Kitchen Storage Ideas for When Every Cabinet Is Already Full

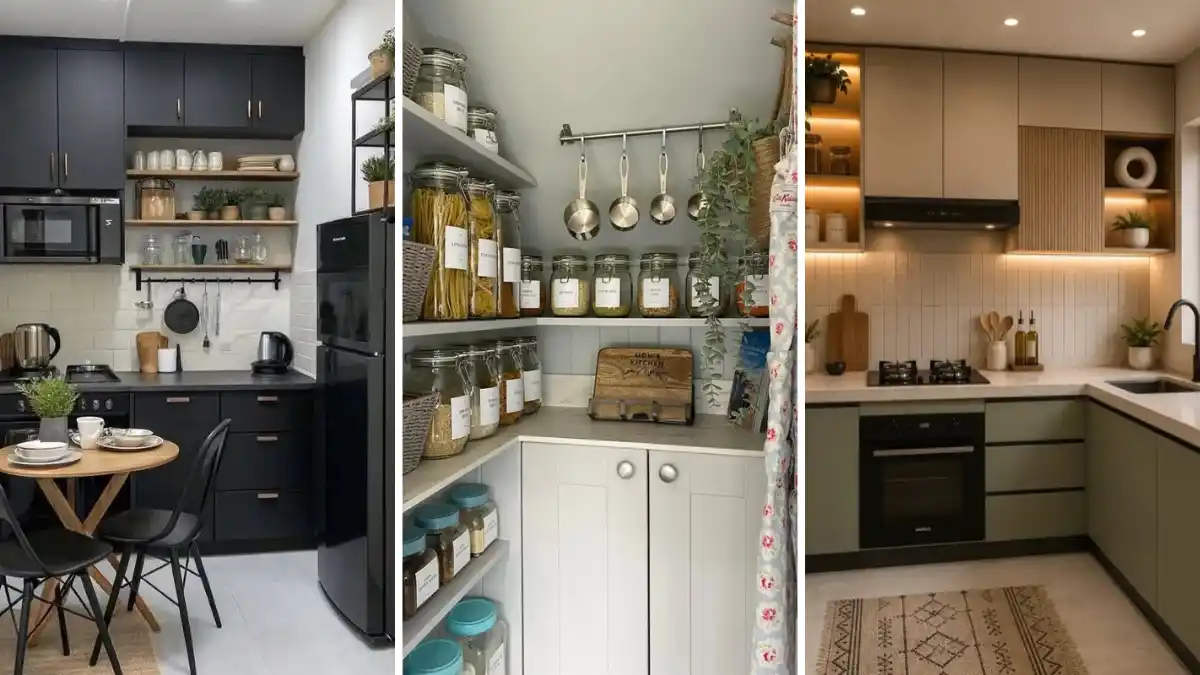
Your baking sheets live in the oven. The blender lives on the counter because no cabinet will take it. And the container lids? Nobody in the house knows where those live.
That’s how most small kitchens feel. The trouble is rarely that you own too much. It’s that regular cabinets waste a lot of what they have: the empty strip above them, the deep back corner where pans go to disappear, and the bare wall between the counter and the uppers that holds nothing at all.
The small kitchen storage ideas below come from real kitchens that fixed exactly that. Some move things out of the cabinets and onto walls, racks, and the top of the fridge. Others make the inside of a cabinet work harder with roll-out trays and a simple lid rack. A few are freestanding pieces you can take with you to your next place.
Each idea comes with a photo, a quick look at what’s working, and a small graphic to help you copy it. Start with the one that fixes your most annoying cabinet.
How to Find the Hidden Space in Your Kitchen Before You Buy Anything
Before you order a single rack, spend ten minutes seeing where your space is actually going. Most cabinet trouble comes from the same few spots. Once you find yours, picking the right idea gets a lot easier.
- Look for empty air. A shelf with one short stack and lots of room above it needs a riser, a second level, or a new job.
- Check the edges of the room. The top of the fridge, the gap over the cabinets, and the wall above the counter are often completely unused.
- Clear out first. Pull anything you haven’t touched in a few months. There’s no point organizing things you don’t need.
- Sort by how often you use it. Daily things go within arm’s reach. Seasonal things go up high or out of the kitchen.
- Measure before you shop. Write down the width, depth, and height of the spot so the rack or bin you buy really fits.
1. Turn the Bare Wall Beside Your Sink Into a Spice and Tool Station

That strip of wall between your counter and your upper cabinets is storage you already have. Most people leave it empty.
The tiny white kitchen in this photo fills it without adding a single cabinet. Look closer and you’ll spot:
- Two slim wooden spice ledges stacked on the tile, each deep enough for one row of jars and sauce bottles.
- A hook rail holding a wood cutting board and a colander, two bulky things that usually hog a whole shelf.
- Small woven baskets on hooks along the backsplash for garlic, tea bags, or little odds and ends.
- A basket caddy on the counter for wooden spoons and cutlery, so a drawer stays free for something else.
Each piece is small on its own. Together they pull a lot of daily stuff out of the cabinets and put it where one hand can grab it.
2. Swap One Row of Upper Cabinets for Long, Deep Open Shelves

Upper cabinets lose space to their own sides, backs, and doors. Long wooden shelves skip all of that. In this sage green galley, two deep shelves run the full length of the wall and hold stacks of plates, cereal bowls, and big glass jars. The end of the base cabinets is left open too, so mixing bowls and dinner plates sit right at hand height.
To set up your own version:
- Pick the wall where you reach for dishes most, usually near the sink or stove.
- Choose shelves deep enough for your widest plate, and use strong brackets screwed into the wall studs.
- Stack like with like. Plates together, bowls together, jars lined up in a row at the back.
- Keep the top shelf for things you use weekly, not every day.
Open shelves look best when the dishes on them get used. Put your everyday set here and leave the fancy one in a cabinet.
| Upper Cabinets | Long Open Shelves |
|---|---|
| Doors need room to swing open. | Nothing to open. Plates come straight off. |
| Side panels and frames eat into the space. | Every inch of the board holds dishes. |
| Hides mixed dishes and clutter. | Shows everything, so matching sets look calmer. |
| Keeps dust off rarely used pieces. | Daily dishes get washed often, so dust rarely builds up. |
3. Take Upper Cabinets All the Way to the Ceiling and Open Up the Ends

Lots of upper cabinets stop short of the ceiling and leave a dusty gap on top. In this L-shaped kitchen, the flat beige cabinets run straight up to the ceiling. That adds an extra band of storage for things you only pull out a few times a year.
Here’s what else is working:
Lit open cubbies at each end. Instead of a skinny end cabinet that’s hard to use, each run finishes with stacked open shelves. They hold coffee and sugar canisters, glass jars, and a plant, all easy to see under the warm shelf lights.
Drawers instead of doors down low. The sage base cabinets next to the oven are deep drawers. Pots and pans slide out toward you instead of hiding in the back corner.
A light strip under the uppers. It doesn’t add space, but it lets you actually see the cutting board, utensil crock, and oil bottles on the counter below.
Full height cabinets with open ends give you more storage and still look light.
💡 Quick Tip
Save the top row for seasonal things like holiday platters, the big roasting pan, and extra serving bowls. Keep a folding step stool beside the fridge so you’ll actually reach them.
4. Hang Every Pot and Pan on a Painted Pegboard Wall
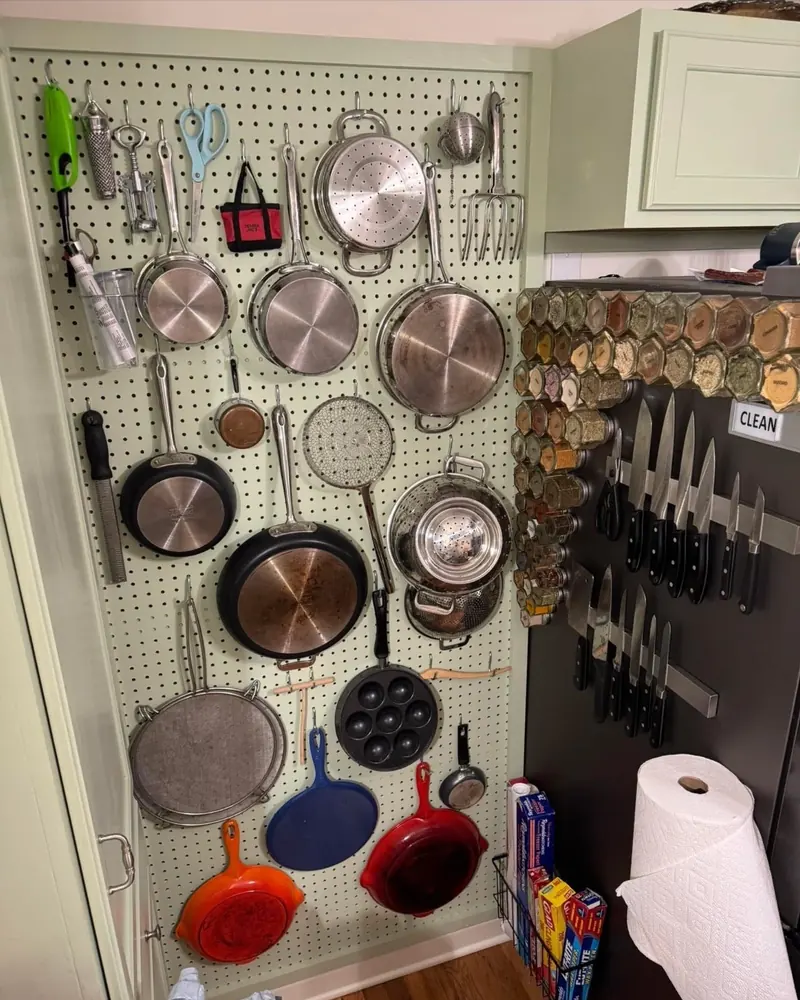
The problem: pots and pans are awkward. They nest badly, handles stick out, and the one you need is always at the bottom of the stack.
The fix: put them on the wall. This tall pegboard, painted soft green to match the cabinets, holds saucepans, nonstick skillets, colanders, splatter screens, a pan with round wells, and a few bright enamel skillets. Small tools like scissors, a grater, and a corkscrew fill the gaps up top.
Right next to it, magnetic strips hold a whole row of knives, and dozens of small spice jars stick to the dark side panel. A wire basket at the bottom keeps foil and plastic wrap boxes standing upright.
Heavy cast iron needs sturdy hooks and a board that’s screwed into the studs. Don’t skimp on the mounting.
Pans stacked three deep in a base cabinet. You lift four to reach one, and loose lids slide around every time the door opens.
Every pan hangs where you can see it. The base cabinet is now free for bakeware, small appliances, or bulk pantry food.
5. Decant Pasta, Rice, and Grains Into Labeled Clip-Top Jars

Cardboard boxes and half rolled bags waste more shelf space than you’d think. They’re all different sizes, they tip over, and you can never tell how much is left. In this small pantry, almost everything moved into clear clip-top jars with simple white labels like linguine, quinoa, couscous, dried lentils, and brown rice.
Tall jars hold long pasta standing up. Shorter jars line up in a neat row along the counter shelf. The shelves also wrap around the corner in an L shape, so the corner gets used instead of wasted. Even the measuring cups hang from a rail on the wall.
Start with the five things you buy most often. You don’t need to decant the whole pantry in one weekend.
Before you start decanting
6. Use a Freestanding Wooden Bookcase as an Extra Pantry

No room to add cabinets? Bring in a bookcase.
The tall pine shelf in this farmhouse kitchen does the job of a pantry cabinet. The bottom shelf holds big glass jars of whole grains with handwritten labels. Above that sits a row of flour and baking jars, then stacked mixing bowls and stoneware, then cookbooks next to a basket of wooden spoons. Woven baskets on top hold what gets used least.
It stands right beside the white built-in cabinets, so it feels like part of the kitchen and not a random piece of furniture. Heavy jars stay low and light bowls go higher, which keeps the whole thing steady.
Check secondhand shops first. Solid wood bookcases are easy to find there and usually cost less than adding new cabinets.
Anchor the bookcase to the wall with a furniture strap.
Keep the heaviest jars on the bottom two shelves.
Use lidded jars and baskets so open shelves stay tidy.
Open bags of flour or sugar. They collect dust on open shelves.
Shelves so deep that jars hide behind other jars.
Placing it right next to the stove where heat and grease reach it.
7. Line Both Walls of a Galley Kitchen With Base Cabinets, but Keep Uppers to One Side

Galley kitchens feel tight fast. This one handles it by treating its two long walls differently.
The left wall gets base cabinets plus a full row of grey shaker uppers above them, with plants lined up across the top. The kettle, tea and coffee canisters, and a tray sit on the counter underneath.
The right wall gets base cabinets only. Above the counter there’s soft pink paint, framed prints, and a stack of decorative tins that can hold baking supplies.
So you get twice the lower storage, which is where heavy pots and pantry food belong anyway. And you skip a second row of uppers closing in over your head. The open wall keeps the narrow room bright, and the copper handles and patterned floor do the decorating.
If your galley already feels like a hallway, this split is a smarter bet than cabinets on every wall.
8. Claim the Empty Space on Top of Your Fridge With a Metal Shelf
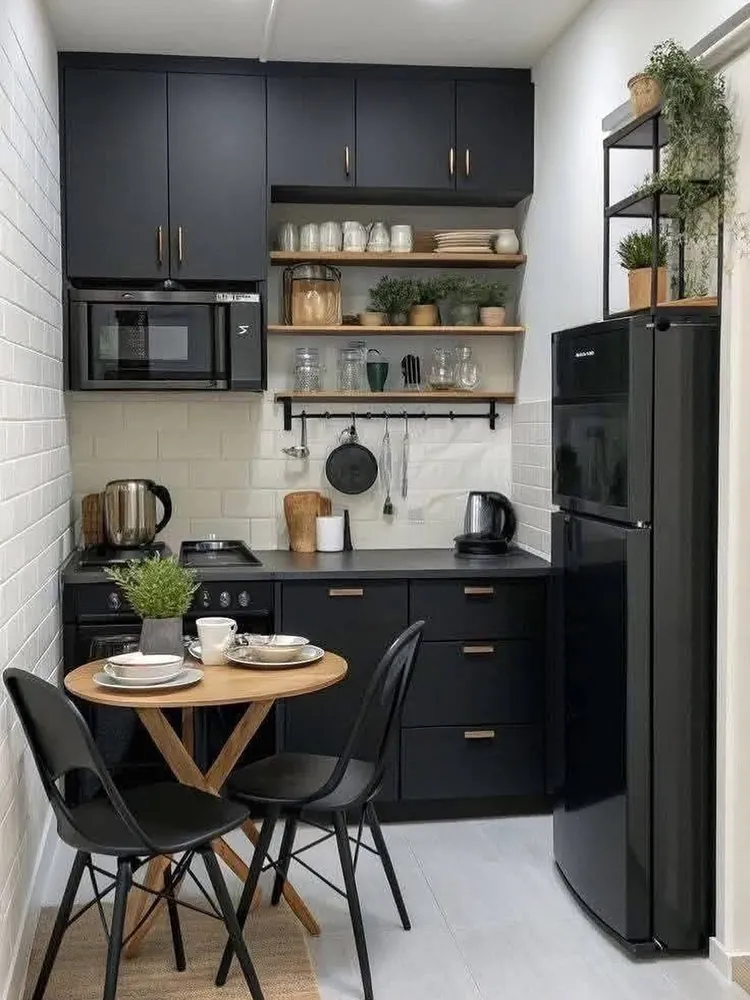
The top of the fridge is one of the most ignored spots in a small kitchen.
In this black kitchen, a slim metal shelf unit sits on top of the fridge and holds potted herbs and trailing plants. It’s part of a bigger plan where every wall goes as high as it can:
- Black upper cabinets with the microwave built right into the row, so it never touches the counter.
- Three wood shelves in the gap between cabinets for mugs, glass jars, and small plants.
- A black rail under the lowest shelf with hooks for a pan, a ladle, and other tools.
- Drawers below instead of doors, so nothing gets lost in the back.
Swap the plants for baskets, and that over-fridge shelf can hold paper towels, extra napkins, or snack bins.
Measure the space between the fridge top and the ceiling or cabinet above. Leave room at the back so the fridge can breathe.
Pick a shelf with flat, steady feet so it doesn’t wobble every time the fridge door swings.
Store light things only up there, like paper goods, plastic wrap, or baking pans you rarely use.
9. Set a Tiered Wooden Riser in the Counter Corner for Spices and Oils

Spice jars lying in a cabinet turn into a guessing game. A stair-step riser fixes that because each row sits higher than the one in front of it. The one here has three tiers and fits right into the corner under the upper cabinets, a spot that usually goes to waste.
How it’s loaded:
- Top tier: oil and vinegar pourers plus tall jars of beans and lentils.
- Middle tier: small spice jars with matching wood lids.
- Bottom tier: lidded ceramic canisters and a jar of garlic.
Everything you season with lives in one corner now, and a whole cabinet shelf opens up for something else.
Height does the sorting for you. Each tier lifts the row behind it, so you can read every label without moving a single jar.
10. Store Rarely Used Items in Lidded Bins on Top of Your Cabinets
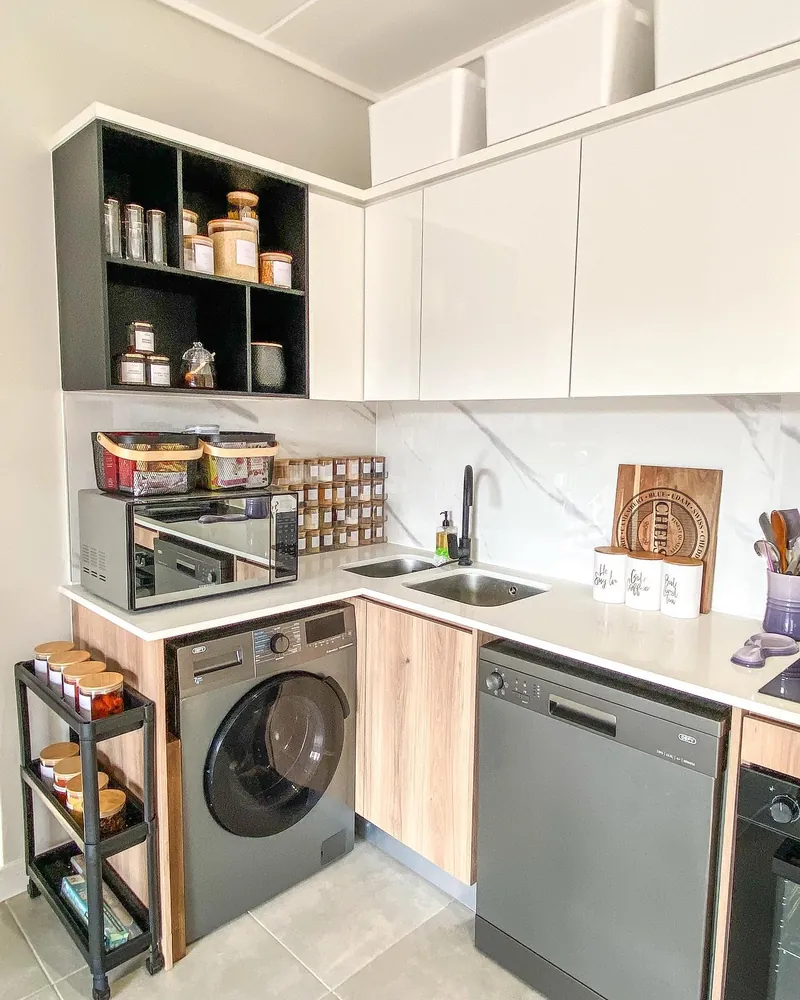
Look up. The gap between your cabinet tops and the ceiling is storage space sitting empty in most kitchens.
This white and wood kitchen fills it with plain white lidded bins lined up along the top of the cabinets. They match the cabinet doors, so from below they look like part of the cabinetry and not clutter.
The same kitchen squeezes in a few more space savers. A black open cubby unit at the end of the upper run holds jars of grains and spices. A neat grid of small spice jars sits against the backsplash, two wire baskets ride on top of the microwave, and a slim three-tier rolling cart parks in the gap beside the washing machine.
Always use lids up there. Open bins on top of cabinets collect grease and dust fast.
- ▸Good for the top: holiday platters and big serving bowls.
- ▸Good for the top: extra paper towels, napkins, and party supplies.
- ▸Good for the top: cake pans and cookie cutters you use a few times a year.
- ▸Keep lower: anything heavy, breakable, or used every week.
11. Add a Shelf Rack Over the Microwave and Stack Storage Above It

A microwave on the counter takes up a big footprint and leaves empty air above it. A metal rack that straddles it puts that air to work. This photo shows two versions side by side.
The single shelf rack on the left adds one level. It holds a small white appliance, a couple of glass jars, and a cup of toothpicks. It’s the better pick when an upper cabinet hangs close above the counter.
The double shelf rack on the right goes up two levels. Stacked plates and bowls sit on the middle shelf next to a polka dot casserole dish, with utensils and a spice jar up top. Choose this one when you have open wall above.
Both leave the microwave right where it was. You just gain one or two new shelves out of thin air.
12. Turn a Tall Cabinet Into an Appliance Garage With Roll-Out Trays

Small appliances are bulky, oddly shaped, and almost impossible to stack. The answer in this photo is a tall cabinet next to the fridge set up just for them.
Up top: fixed shelves hold the bigger, lighter pieces. An air fryer sits on one shelf and a round countertop cooker with its lid sits on the next.
Down low: three wooden roll-out trays hold a toaster, a blender, a can opener, and a couple more small machines. Pull the tray, lift the appliance out, and you’re done.
The detail that matters: the trays slide on side rails, so nothing gets lost in the back of a deep cabinet. Matching white appliances also keep it looking calm when the doors are open.
Your counters stay clear, and you still reach every appliance in one move.
Pull out every small appliance you own and keep only the ones you used in the last few months.
Measure your tallest appliance before buying roll-out trays so it clears the shelf above.
Put heavy machines like the blender on the lowest trays and lighter ones higher up.
Wrap each cord with a small tie and tuck it beside its appliance so trays slide freely.
13. File Food Container Lids Upright in a Lid Rack

Loose lids are the reason the container cabinet never quite closes.
Here’s what this base cabinet does differently:
- Glass baking dishes are nested by size on the top shelf, with larger rectangles in one tower and smaller dishes in another.
- Lids stand on edge in a wooden rack on the lower shelf, just like files in a drawer.
- The lids are grouped by color and size, so orange, yellow, and blue each get their own slot.
- Plastic containers nest behind the rack, out of the way but still easy to grab.
A pile that used to spill across the whole shelf now fits in one strip at the front.
Lids tossed flat in a wobbly pile. Every time you reach in, a few slide out onto the floor and you still can’t find the match.
Lids stand upright, sorted by color. You flip through them like files and pull the right one in seconds.
14. Park a Baker’s Rack by the Window for Appliances Your Cabinets Can’t Hold
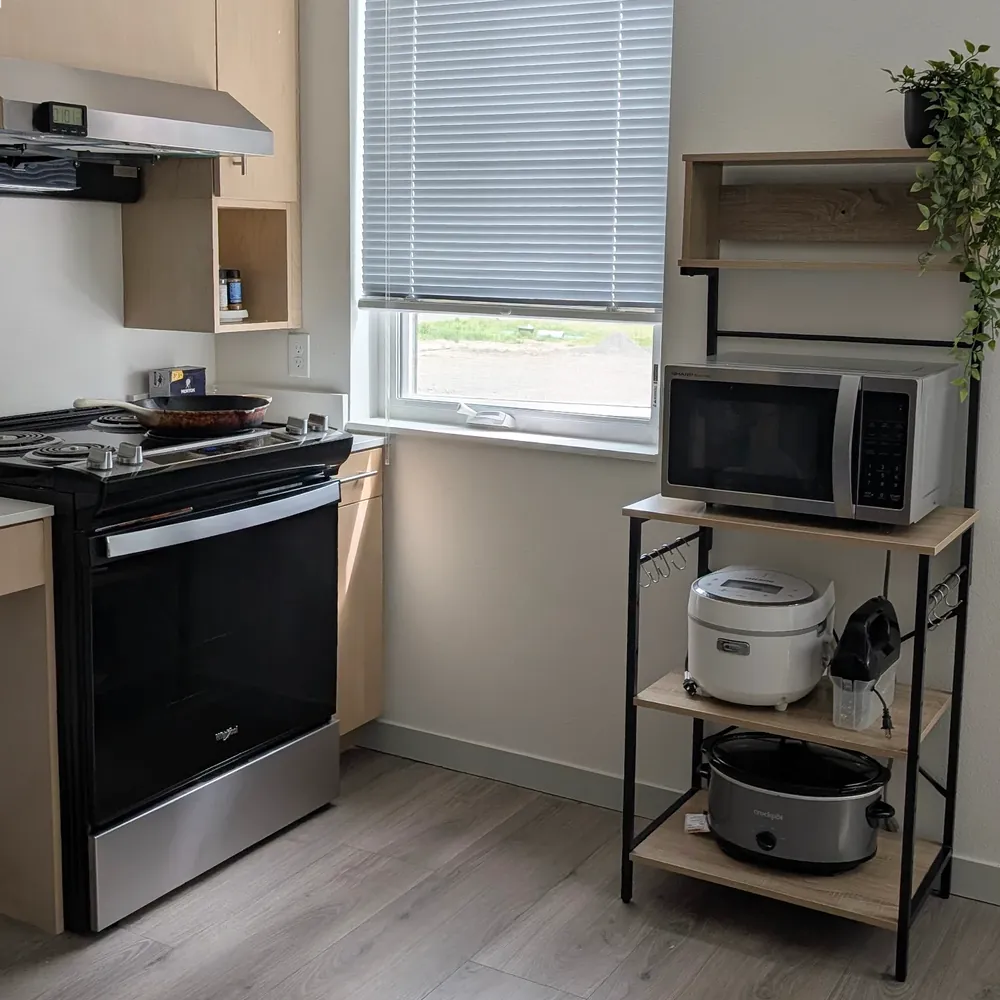
Some kitchens just don’t come with enough cabinets. This apartment kitchen solves that with a baker’s rack, black metal with light wood shelves, standing against the empty wall beside the window.
The microwave gets the main top shelf. A rice cooker and a hand mixer share the middle shelf, and a slow cooker sits on the bottom. Small S hooks on the sides are ready for oven mitts or utensils, and a little hutch above the microwave holds a trailing plant.
No drilling or installing needed, which makes it a solid choice for renters. When you move, it comes with you.
Put the heaviest appliance on the lowest shelf so the rack stays steady.
15. Hang a Wall Plate Rack So Dishes Live Outside Your Cabinets
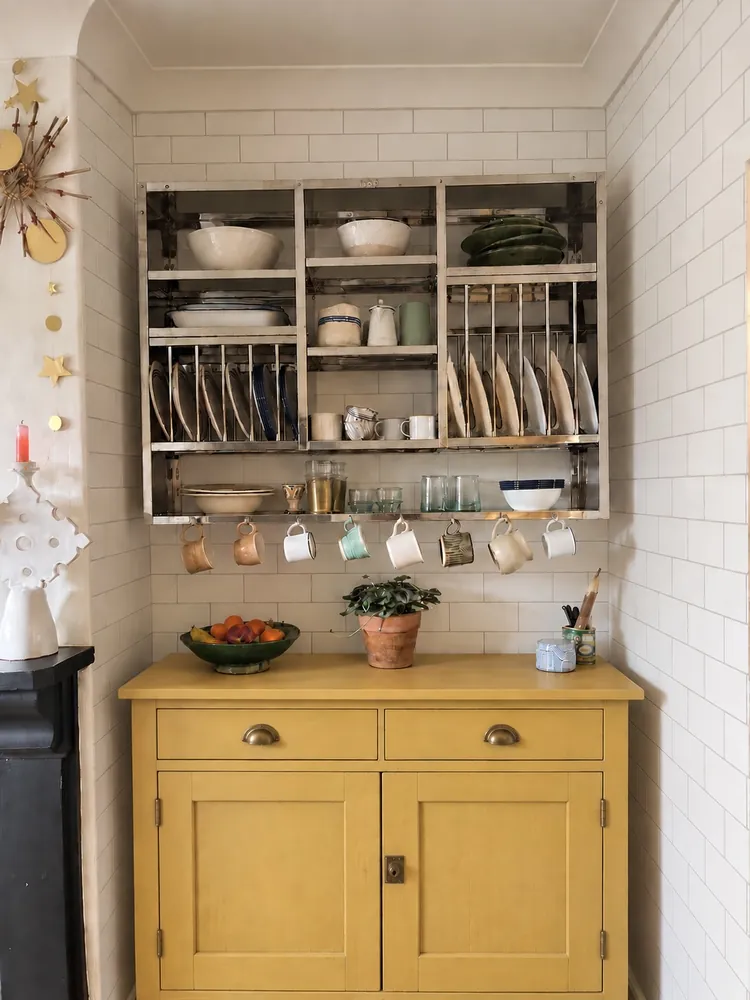
Plates don’t have to be stacked in a cabinet at all. In this cozy corner, a stainless steel rack mounted on the tiled wall holds them upright in rows, with bowls, a teapot, and small jugs on the shelves beside them.
Mugs: they hang from a row of hooks under the rack. The mix of colors feels relaxed, not fussy.
Glasses: they sit on the bottom shelf, right at eye level.
The sideboard below: its drawers and doors can take the things that don’t look good on display, like linens, foil, and serving spoons.
Mount one over your sink and wet plates can drip dry right where they’re stored.
| Plates in a Cabinet | Plates in a Wall Rack |
|---|---|
| Stacked, so you lift the top ones to reach the bottom. | Upright, so you slide out any plate you want. |
| Fill a whole cabinet shelf. | Free that shelf for pots or pantry food. |
| Need to be dried before putting away. | Can drip dry if the rack hangs over the sink. |
| Hidden behind doors. | On display, so keep a set you like looking at. |


