19 Dorm Room Storage Ideas That Double Your Space


Your dorm room is probably smaller than your bedroom at home, and you still have to fit clothes, snacks, books, a mini fridge and a whole school year of stuff into it. The good news is that most dorm rooms have more space than they seem to. It’s just hiding under the bed, behind the door and up on the walls.
These dorm room storage ideas come from real student rooms. You’ll see beds lofted high enough to fit a desk and a chair underneath, mini fridges framed by cube shelves to make tiny kitchens, and roommates sharing one storage wall between their beds.
There are cheap fixes too, like a hook clipped to the bed frame or colored bins that tell you what’s inside at a glance.
Most of these setups skip nails and drills, so they work in rooms with strict rules. You don’t need all nineteen.
Pick two or three that fit your room and your budget, then build from there. Start with the bed, since that’s where the biggest space win usually hides.
1. Loft Your Bed and Build a Whole Room Underneath
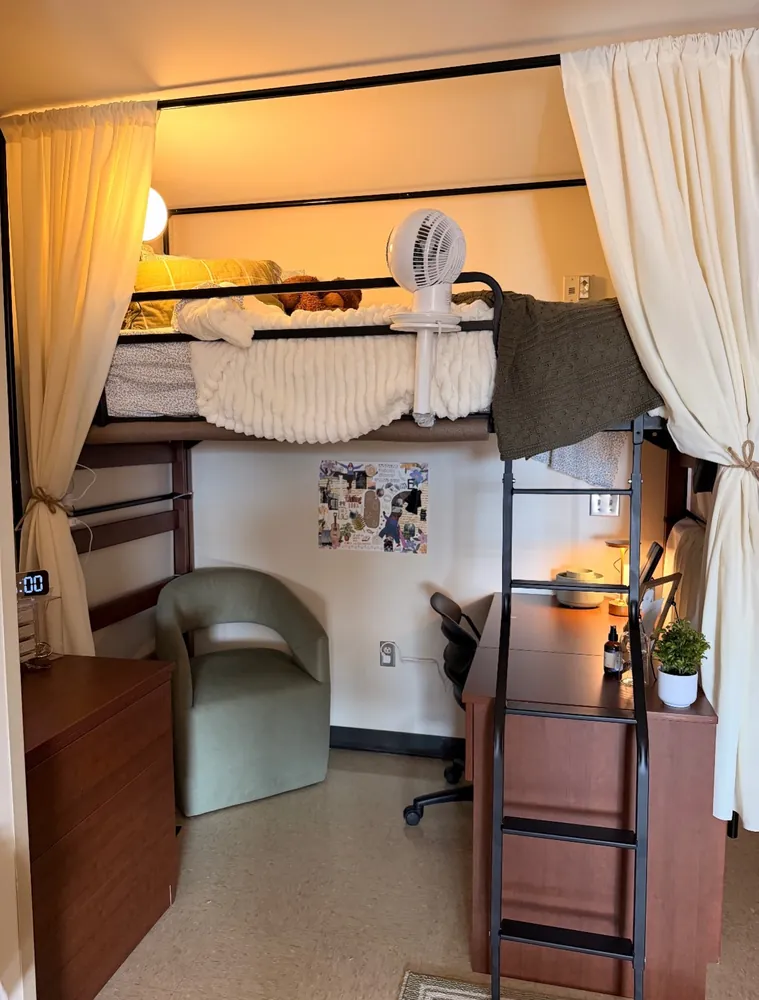
Look at how much is happening under that bed. A desk, a rolling chair, a soft sage armchair and a dresser all live in the space the bed used to take up by itself.
Lofting is the biggest space win in any dorm because it gives you back the floor. The cream curtains are the clever part.
Hung from a rail near the ceiling and tied back with simple rope, they close off the bed for naps and hide the clutter below when you want the room to look calm.
- Ask housing if your bed frame can be lofted, and how high it can go.
- Put the desk on the side with the outlet so cords stay short.
- Clip a small fan to the bed rail instead of using a nightstand.
- Add curtains last, once you know where everything sits.
Leave enough headroom to sit up in bed without bumping the ceiling.
The bed sits on the floor and eats a full wall. The desk, dresser and chair fight over whatever floor is left.
The bed goes up high. A desk, a reading chair and a dresser fit underneath, and curtains hide it all when you want a tidy look.
2. Raise the Bed to Its Highest Setting and Fill the Built-In Drawers
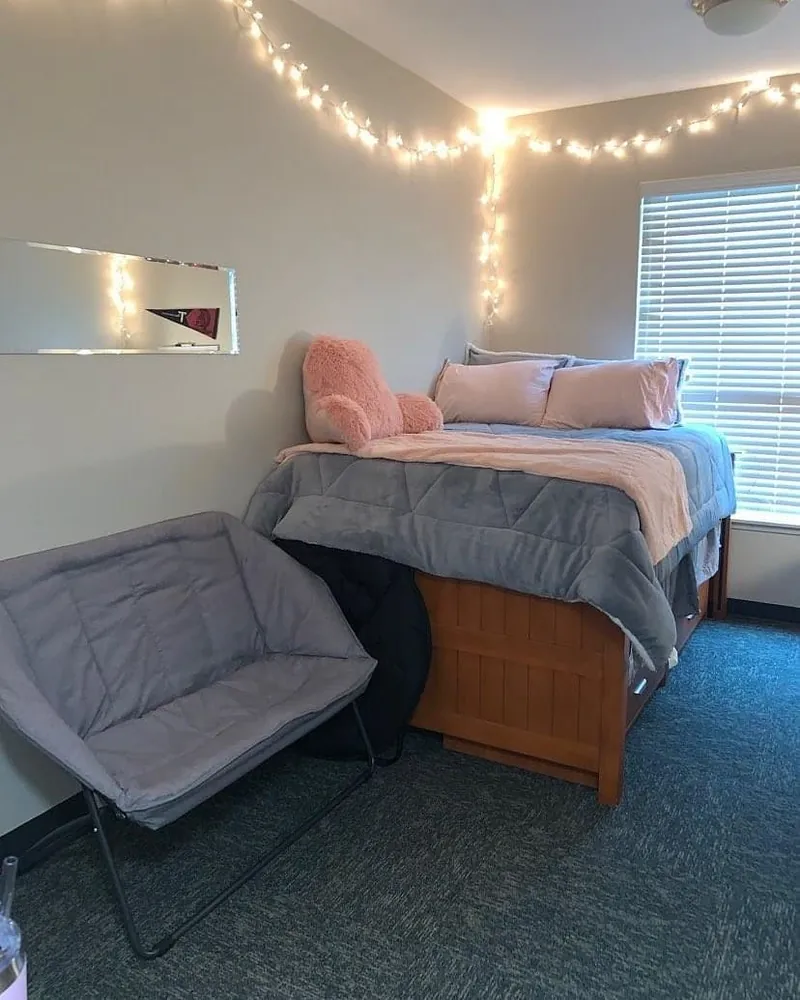
The wood base on this bed has drawers built into the side, and the frame sits high enough to tuck even more storage around it.
- Drawers first: fold jeans, sweaters and spare sheets in there so your closet stays free for hanging clothes.
- The corner by the bed: something big, soft and black is tucked right against the frame. Bulky things like a duffel bag or a winter coat fit nicely in that spot.
- Folding seating: the gray saucer loveseat folds flat, so it can slide behind the door when you need floor space for packing.
- Wall mirror: a long mirror hung flat on the wall does the job of a standing mirror without using any floor.
Four small choices, and the middle of the room is still open carpet.
⚠️ Watch Out
Check with your RA before you change the bed height. Some schools have rules about it, and a loose pin can make the frame wobble. Sit on the edge and test it before you load the drawers.
3. Stack Your Bed on a Mix of Dressers, Cubes and Baskets

Here the bed sits right on top of storage furniture, so the whole space under the mattress turns into a wall of drawers.
The dresser at the foot. Three wood drawers hold everyday clothes, so this room doesn’t need a separate dresser taking up floor.
The white cube unit. White bins fill the cubes near the head of the bed. That’s a good home for things you grab less often, like extra sheets or backup snacks.
The basket gap. A tall woven basket slides into the space between the cubes and the dresser. It works well as a hamper.
The rolling cart. A black three-tier cart parks by the desk with notebooks and supplies, and it rolls away when you need room.
Measure each piece before move-in day. They need to be close in height so the mattress sits flat.
4. Frame the Mini Fridge With Cube Shelves to Make a Snack Station

Two black cube organizers stand on either side of a mini fridge, and one long board across the top ties them together.
That board is the smart move. It turns three separate pieces into one unit and makes a covered nook where the microwave sits right on top of the fridge. Beige fabric bins fill the lower cubes, so food and dishes stay hidden but easy to reach.
- Pick cube units that stand a little taller than your fridge and microwave stacked together.
- Leave a small gap behind the fridge so warm air can escape.
- Lay a sturdy board across both units and check that it sits flat.
- Give every bin one job, like snacks, plates or cleaning wipes.
The top cubes are left open here, which lets light from the window come through. Fill them later if you need more room.
| Keep in the top bins | Keep in the bottom bins |
|---|---|
| Snacks you eat every day | Extra paper towels and trash bags |
| Cups, bowls and forks | Dish soap and cleaning wipes |
| Tea, coffee and drink mixes | Backup groceries from home |
5. Run a Low Cubby Shelf Along the Bed Instead of a Nightstand

Nightstands eat floor space in a tiny room. A long, low cubby shelf pushed along the wall side of the bed solves that. It sits right at mattress height, so everything is within reach while you’re lying down.
In this room, the white shelf runs almost the whole length of the bed. Each open cubby can hold one thing you want close at night:
- your phone charger and earbuds
- a book or two for before sleep
- glasses, lip balm and a water bottle
- a small bin of hair ties or a sleep mask
Keep the top of the shelf mostly clear. It’s handy as a ledge for setting down a cup or your phone when you’re half asleep.
One shelf does the job of a nightstand and a bookcase, and it tucks into the narrow strip between the bed and the wall.
6. Mix Fabric Drawers and an Open Shoe Shelf Under a Raised Bed

Under this navy plaid bed, two kinds of storage sit side by side, and each one handles a different kind of mess.
Navy fabric drawers sit closest to the desk. They hide the things you don’t want on display, like socks, gym clothes or spare chargers. The dark color matches the bedding, so the stack blends in.
An open wood shelf fills the rest of the space. The bottom rows hold sneakers, and the upper cubbies have a wicker basket and a small wood crate with snacks.
The trick is putting shoes in the open part. Shoes need air, and you grab them every day. A closed drawer would just slow you down on your way to class.
Keep everyday shoes on the open shelf, on the side closest to the door.
Put out of season clothes in the closed fabric drawers.
Stuffing damp sneakers into a closed bin.
Pushing heavy boxes so far back that you can’t reach them.
7. Hang Your Backpack on a Hook Right on the Bed Frame

Backpacks are the thing that always ends up on the floor. In this room, a hook on the edge of the wood shelf at the end of the bed fixes that. The red backpack hangs there, ready to grab on the way out.
The same shelf holds a small projector on top, so one board is doing two jobs.
Other hook spots that work in most dorms:
- the ladder or side rail of a lofted bed
- the end of your desk
- the inside of your closet door
It takes two seconds to hang it up, and the floor stays clear.
Find a sturdy edge, like a bed rail or the side of a shelf.
Use a clamp-on or over-the-edge hook so you don’t need nails or screws.
Hang a full bag and give it a tug. If the hook slides, move it to a thicker edge.
8. Add a Desk Hutch That Doubles as Your Vanity

Desk space disappears fast once makeup, pens and photos move in. A cream hutch set right on top of the desk stacks all of it upward. The open middle bay holds a lighted vanity mirror, so getting ready and studying happen in the same spot.
Notice how each shelf has a container. A woven basket holds small things, a clear tray keeps pens and scissors standing up, and a little drawer at the bottom hides what you don’t want seen.
The back panels are lined with pink striped paper, which makes plain shelves look custom. A drawer tower next to the desk picks up the overflow.
Recreate this hutch setup
9. Slide an Over-the-Fridge Rack Into the Corner
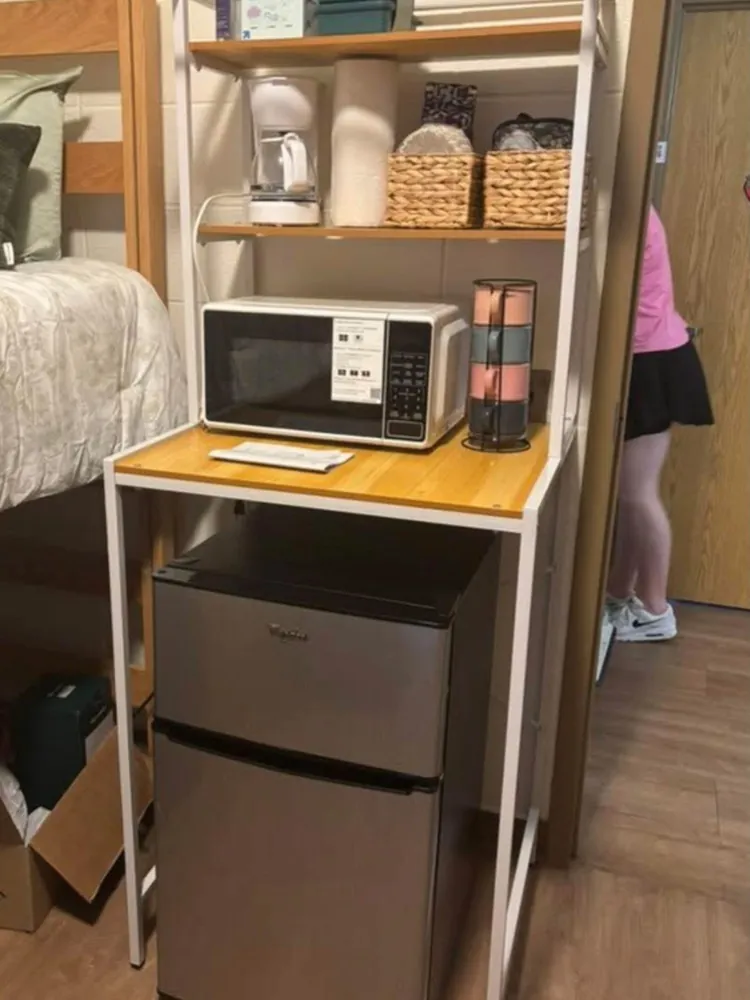
No tools, no extra furniture, just one tall rack.
A white metal frame stands over the mini fridge and adds two shelves above it. The wood shelf right on top of the fridge holds the microwave and a stand of stacked mugs.
The shelf above that is the coffee spot, with a coffee maker, paper towels and two woven baskets for snacks and paper plates.
Here’s how the layers stack up, top to bottom:
- Top shelf: spare items you don’t need every day
- Middle shelf: coffee gear and snack baskets
- Wood shelf: microwave and mugs
- Bottom: the fridge itself
Push it right next to the bed, like this one, and you get a snack corner that uses no more floor than the fridge already did.
10. Give Every Cube a Job in Your Mini Kitchen Nook

Every open cube in this setup has one clear purpose. Two white cube towers stand on each side of a cream mini fridge, and nothing is placed at random:
- Left top cube: a countertop ice maker and rolled hand towels.
- Right top cubes: drink stuff, like tumblers, a clear snack bin and an electric kettle.
- Bottom cubes: woven baskets for anything that looks messy.
- Above the fridge: the microwave, with a toaster sitting on top.
The small extras pull it together. Little lights are tucked under the top of each cube so you can see at night. A paper towel roll is mounted inside a cube, and pink gingham oven mitts hang on hooks along the side.
⚠️ Watch Out
Many dorms limit which appliances you can bring, and toasters, kettles and ice makers are often on that list. Check your housing rules before you buy, and don’t run several appliances off one power strip at the same time.
11. Color Code Your Bins So You Grab the Right One Fast

Pink, blue and white. That’s the whole system on this slatted white shelf above the mini fridge, and it makes sense the second you see it.
When every bin looks the same, you end up pulling out three before you find the right one. Different colors give each category its own spot, so you remember where things go without labels.
On top, a two-tier clear caddy holds lotions and sprays so they stand up instead of tipping over.
The fridge door gets used too. Photos stick on with magnets, so the fridge doubles as a memory board and your walls stay free.
Pick your colors before you shop, then buy the bins all at once so the sizes match.
| Bin color | What goes inside |
|---|---|
| 🩷 Pink | Hair tools, skincare and beauty stuff |
| 💙 Blue | Snacks and drink packets |
| 🤍 White | School supplies, paper and spare chargers |
12. Turn the Wall Above Your Desk Into a Pegboard

Wall space is free storage in a dorm, and a pegboard puts it to work. The light wood pegboard here covers the wall behind the desk and holds small white shelves, a clock, a hanging hat, plants and candles. The desk itself holds a laptop and not much else, which is the whole point.
The best part is that nothing is fixed. Pegs and shelves move around whenever your needs change, like when finals week calls for more space for books.
- Measure the wall above your desk.
- Choose a pegboard with legs, one that leans behind the desk, or one made for removable strips.
- Start with two or three small shelves, then add hooks.
- Keep heavier things low and light decor up high.
Use hooks for headphones, a hat or your keys.
Leave some empty pegs so you have room to grow.
Drilling into dorm walls without asking first.
Filling every single peg until it looks cluttered.
13. Hide Under-Bed Storage Behind a Bed Skirt and Add a Storage Cube
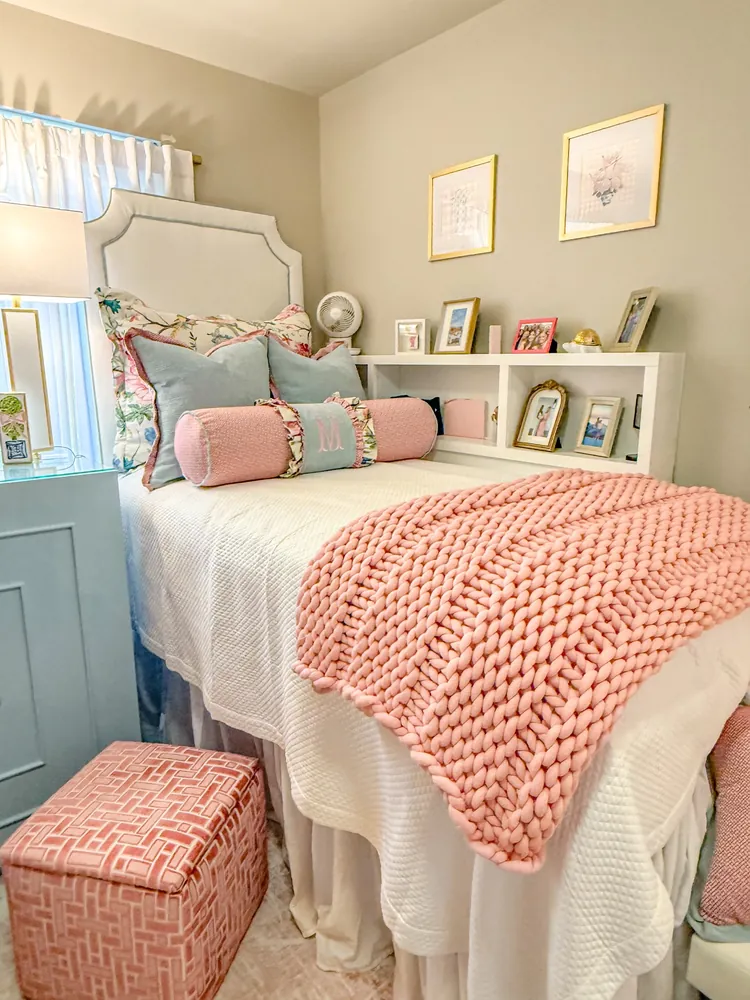
Everything messy in this room is out of sight, and the room still looks soft and pretty. Two pieces do the hiding.
The long bed skirt. It falls all the way to the floor, so whatever is under the bed stays out of view. Suitcases, bins and extra bedding can all go down there. A raised dorm bed leaves a lot of room underneath, and the skirt just makes it look tidy.
The pink cube by the bed. It looks like a footstool, but cubes like this usually have a lid that lifts off. That means room inside for blankets, shoes or snacks, plus an extra seat on top when a friend comes over.
Behind the bed, a white shelf runs along the wall and holds framed photos, which keeps them off the desk.
14. Share a Center Storage Wall With Your Roommate

Between the twin beds sits a storage setup that splits right down the middle. Two tall white drawer towers stand on each side of a pale blue mini fridge, all under one long top.
Each roommate gets the drawer tower on their own side, and the fridge in the middle is shared. The top works as a shared nightstand with a lamp for each person.
The striped ottomans at the foot of each bed add seating, and boxy ottomans like these often open up for extra storage.
- Agree on fridge shelves on day one.
- Keep the top clear except for the lamps and one small thing each.
- Use the small top drawers for chargers, pens and keys.
| Keep in your own tower | Keep in the shared space |
|---|---|
| Chargers and earbuds | Drinks and snacks in the fridge |
| Makeup and skincare | A plant or small decor on top |
| School supplies | A small shared box of plates and cups |
15. Use the Back of the Door for a Jewelry and Makeup Cabinet

The door is the most forgotten storage spot in a dorm. In this room, a pink cabinet hangs over the top of the door and swings open to show rows of necklaces, earrings, makeup and small bottles.
Most cabinets like this have a full mirror on the front, so you also get a place to check your outfit. It holds what would usually crowd a dresser top, and it needs no nails because it hooks over the door.
Things that fit well inside:
- necklaces that tangle in a drawer
- lipsticks and small makeup
- hair clips and scrunchies
- a perfume or two
Check that your door still closes all the way with the hooks on before you load it up.
Your door already has space you never use. One cabinet turns it into a jewelry box, a makeup shelf and a mirror, and your dresser top stays clear.
16. Put Lidded Boxes in Open Bedside Shelves to Keep Them Neat

Open shelves look great for about a week. Then the cords, receipts and loose pens creep in. The roommates in this room got ahead of that with small lidded boxes.
Shelves on both sides. Each twin bed has its own long white shelf along the wall, so nobody has to fight for space.
Boxes for the small stuff. Pale blue boxes with lids sit in some of the cubbies. The messy things go inside, and the shelf stays calm to look at.
Books stand in a row. One end of the shelf holds books upright, so they’re easy to grab for class.
Between the beds, a small white fridge and a three-drawer chest share the window wall and add even more storage.
What to hide in lidded boxes
17. Line Up Clear Bins Under the Bed So You Can See What’s Inside
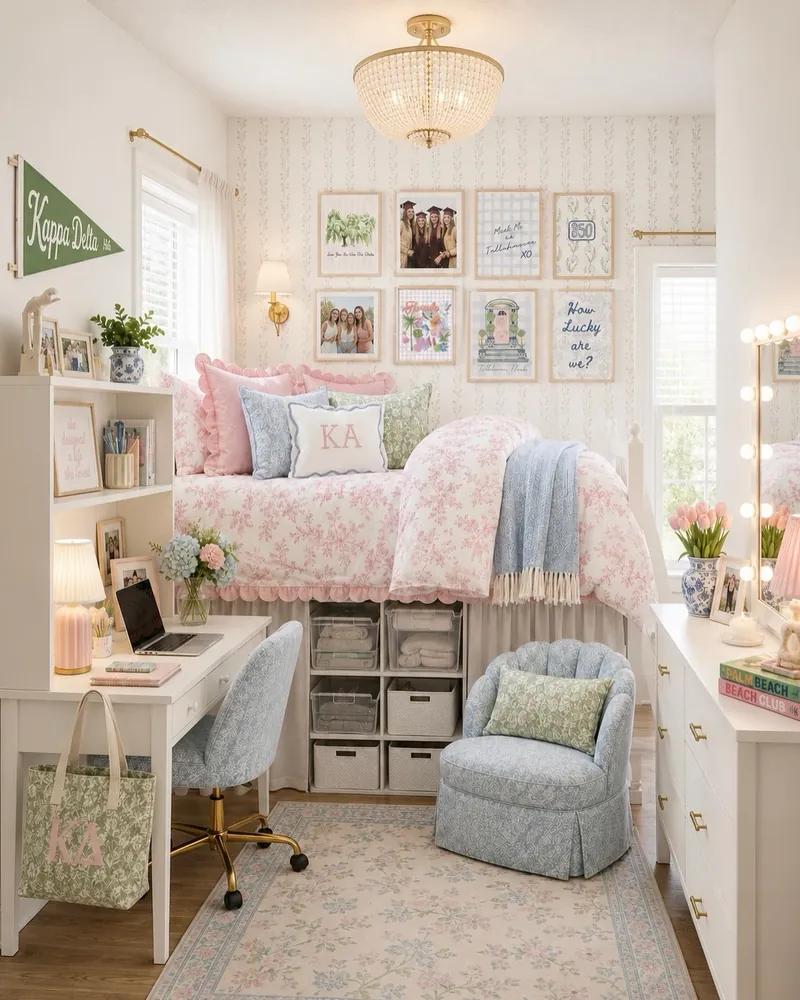
Under-bed storage only works if you remember what’s down there. In this room, a white shelf unit sits under the raised bed, and the pleated bed skirt is pulled back to show it.
The top row has clear bins with folded towels. The bottom row has white baskets.
- Put things you use every week, like towels, in the clear bins up top.
- Use solid baskets on the bottom for things you rarely need, like winter gear.
- Raise the bed so the shelf fits with a little room to spare.
- Let the bed skirt fall back down when you’re done so the room looks tidy.
Clear bins mean no more digging around on laundry day.
18. Build Your Bed Base From Cube Organizers With Matching Bins

A whole dresser’s worth of storage is hiding under this white comforter. The bed sits on a white frame with a cube organizer underneath, and every cube holds the same gray fabric bin with a handle.
- Matching bins look calm, even when what’s inside is a mess.
- Handles let you pull a bin out with one hand.
- The open spot at the end of the bed fits a big woven basket for extra throws.
Give each bin one job and stick to it. Socks go in one, school supplies in another, and snacks somewhere far away from the socks.
Boxes and bags get shoved under a low bed, and you crawl on the floor to find anything.
A cube organizer faces out with matching bins you can pull out while standing up.
19. Mount a Wall Shelf With Hooks for Caps and Headphones
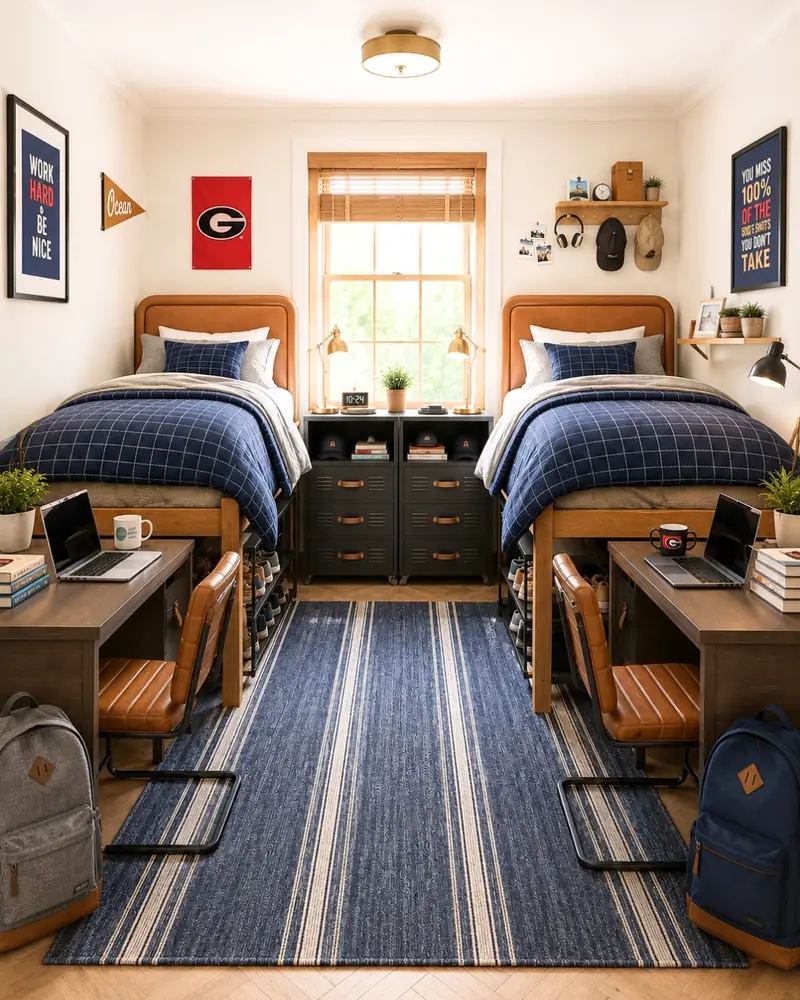
Caps and headphones always seem to end up on the bed. Above the bed on the right, a small wood shelf has a row of hooks underneath.
Two caps and a pair of headphones hang there, and the top holds a clock, a small box and a plant. One piece handles both display and hanging.
The rest of this shared room keeps the floor clear too. Two metal drawer cabinets sit between the beds as nightstands, and shoe racks slide under each bed.
Hang it on the side of your bed closest to the door, so you can grab your cap on the way out. And keep it light. Heavy bags will pull removable hooks right off the wall.
📌 Good To Know
Many dorms don’t allow nails, so look for a hook shelf that hangs with removable strips. Read the weight limit on the package and stay well under it.
A small dorm room doesn’t have to feel cramped. Once you lift the bed, use the door and the walls, and give every bin a job, a lot of floor comes back.
Start with one change this week, maybe under-bed shelves or a hook rail, and live with it for a few days before buying anything else.
And talk to your roommate before you set up anything shared. A five minute chat about who gets which fridge shelf saves a lot of grumbling later in the semester.
Save this list of dorm room storage ideas for move-in day, and pin it for the next time your room starts to feel small.