
20 RV Remodel Ideas That Make an Old Rig Feel Brand New

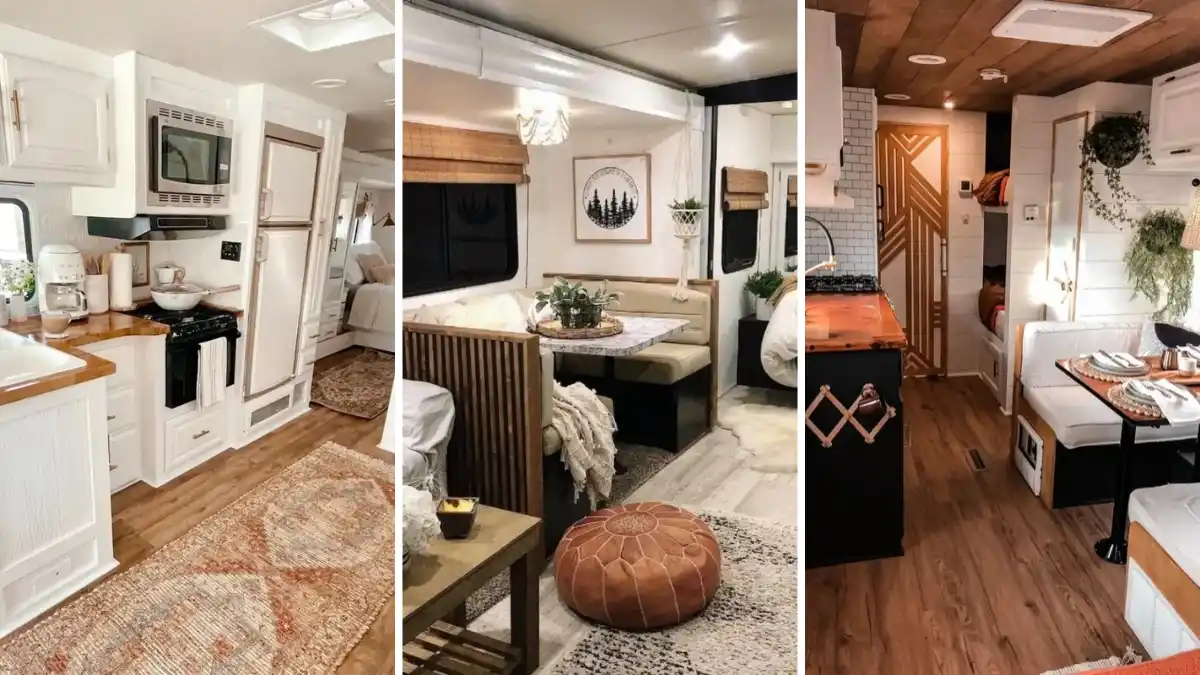
Old RVs often hide solid bones under honey oak, beige wallpaper, and floral valances. Maybe yours runs fine and the layout works, yet every trip starts with stepping into a space that feels tired and dark.
Most of that dated feel comes from surfaces, not structure. Paint, fabric, lighting, and a few simple builds can change the whole mood without gutting the camper. Better still, plenty of these projects suit beginners with basic tools and a free weekend.
These RV remodel ideas pull from reworked rigs of every size, plus one honest before photo to plan from. Inside are cabinets painted white, sage, and navy, wood beams and plank walls, a coffee bar, a slim farmhouse dinette, cozy bunks, and a black and white pop up camper.
Each idea shows what to copy, what supplies to grab, and what to watch for on travel days. Start with the spot that bugs you most, and let the rest follow.
1. Paint the Dinette Base Navy and Give the Cushions New Covers

Navy paint on the dinette base does a lot of work in this rig. The boxy bases under the booth seats are a deep blue now, and the cushions wear a cream fabric with thin brown stripes. Suddenly the dinette looks like real furniture instead of factory trim.
Pick a tough outdoor or performance fabric for the new covers, since dinette cushions face spills and sun every day. An upholsterer can sew them, or a simple zip cover works if you sew a little. For the bases, a durable enamel in deep navy holds up to shoes and bags.
Notice how everything around the navy stays soft and light. White cabinets, a gray tweed sofa, and pleated shades keep the blue from feeling heavy. Brass shows up once, in a gold wall sconce with a glass shade, and that single warm spot is enough.
2. Add Geometric Wood Strips to a Plain Flat Door

The build: thin pine strips, a miter saw, wood glue or construction adhesive, and one flat door.
Flat doors are the dullest part of an older rig, and this RV remodel gave one a fresh face. Light wood strips run in angled lines across a tall panel by the kitchen, likely the fridge door since it has two handles. A smaller X pattern repeats on the cabinet over the dinette.
Sketch your pattern with painter’s tape first and live with it for a day. Cut the strips, stain or seal them, then glue them down one line at a time. Around the door, white shiplap and a dark wood plank ceiling keep the pattern grounded, so it reads as art and not clutter.
Supply note: Keep the strips thin and light. Fridge and entry doors open all day, and extra weight can strain the hinges.
3. Turn the TV Wall Into a Sage Green Fireplace Wall
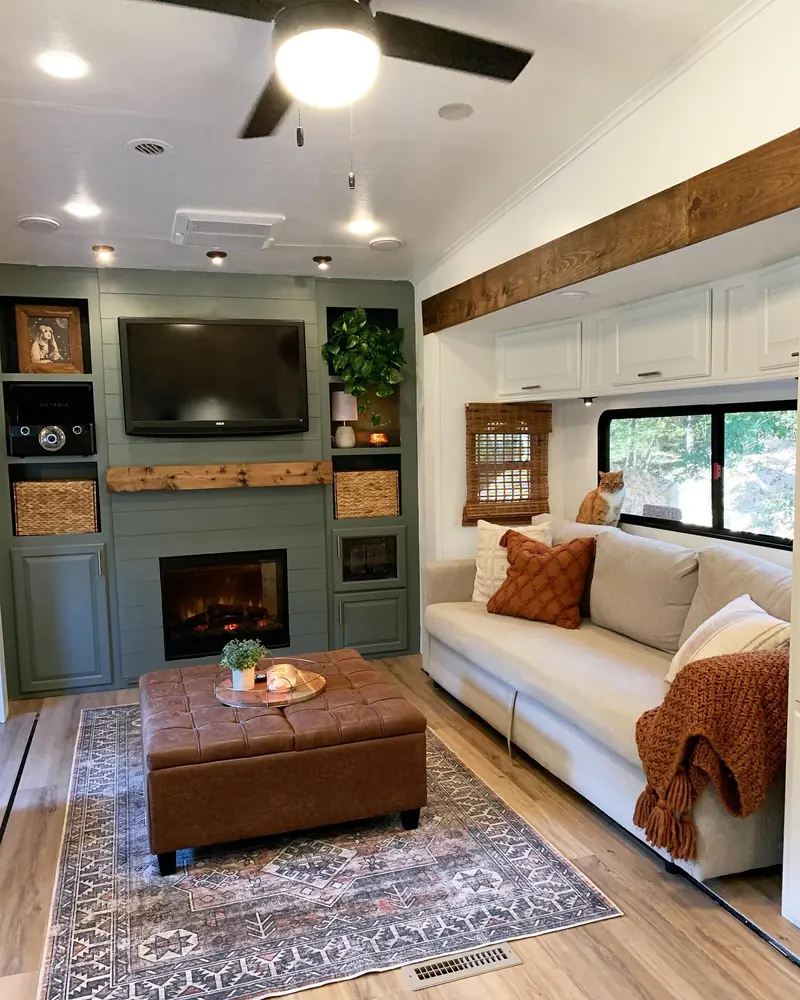
- Wall: horizontal shiplap painted a soft sage green
- Main piece: an electric fireplace insert below the TV
- Shelves: open cubbies with woven baskets and a trailing plant
- Finishing touch: a rustic wood mantel shelf
Many older rigs come with a bulky wood entertainment center. Here, that whole wall wears green planks, baskets fill the cubbies, and an electric fireplace glows below the TV. Most inserts plug into a regular outlet, though the heater side draws a lot of power, so save it for shore power days.
Budget swap: Skip the shiplap and paint the existing cabinet faces sage instead. One color across doors, shelves, and trim gives a built in look for the cost of a gallon of paint.
4. Wrap the Dinette Back in Vertical Wood Slats

Slats turn the plain back of a booth dinette into a feature. In this trailer, dark stained vertical strips cover the side facing the sofa, so the living room gets a warm wood wall instead of a vinyl seat back. Thin square dowels or 1×2 boards, glued and pinned to a plywood skin, will do the job.
Why it works:
- It separates the dinette and the lounge without blocking light.
- Dark wood ties in with the bamboo shades and black window frames.
- Vertical lines pull the eye up, so a low ceiling feels a bit taller.
Skip this: Do not slat over the seat lids. Most dinette benches hide storage or utility access underneath, so keep those hinged tops clear.
5. Frame the Slide Out With Chunky Wood Trim
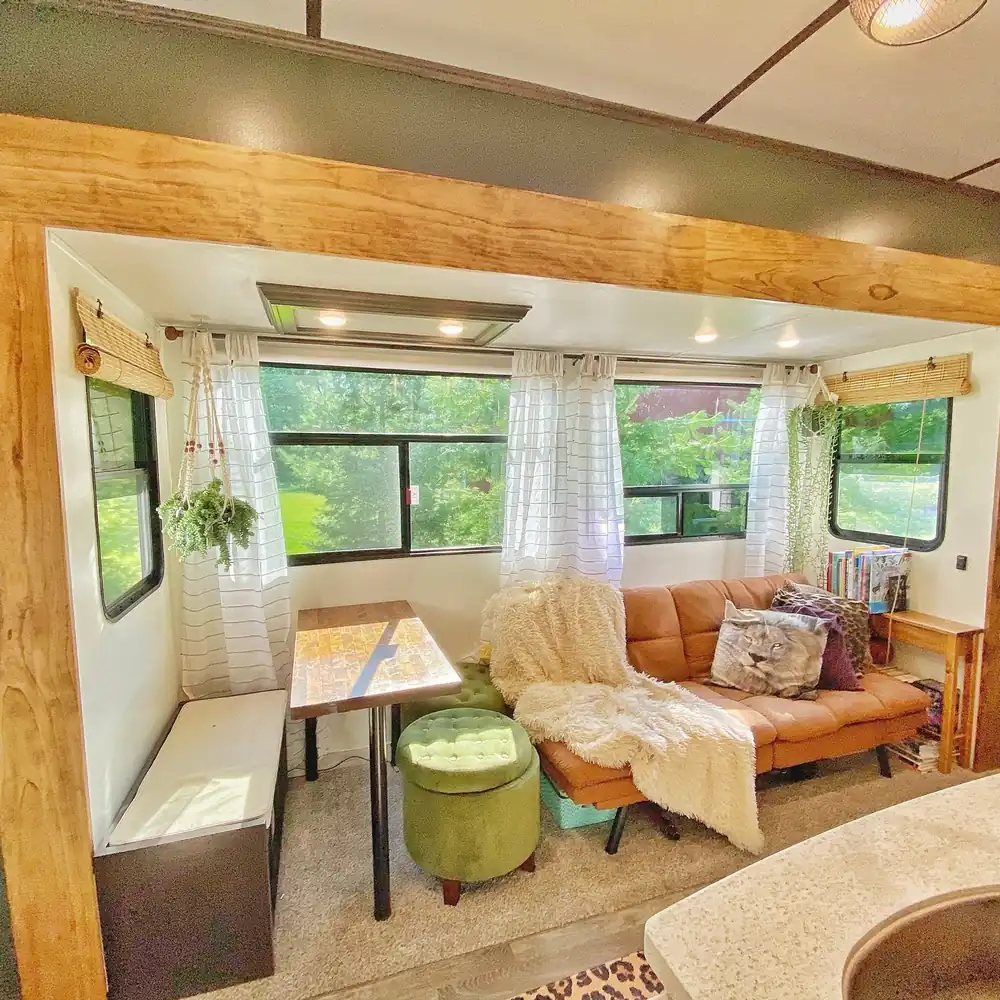
Best for: rigs with a wide living room slide and plain white walls.
A slide out opening usually gets thin vinyl trim from the factory. Here, a camper remodel swapped that for wide, knotty boards with a golden stain, and the slide now feels like its own little room. Sheer white curtains with thin stripes and bamboo roll up shades soften the windows.
Measure carefully before you cut anything. Boards must clear the slide seals and wipers on every side, or the room will bind when it moves. Pine is light and cheap, and staining it before you hang it saves a mess.
Upgrade idea: Paint the wall above the trim a deep green, the way this rig does. The dark band makes the honey wood stand out even more.
6. Rebuild the Bunks as Cozy Shiplap Built Ins
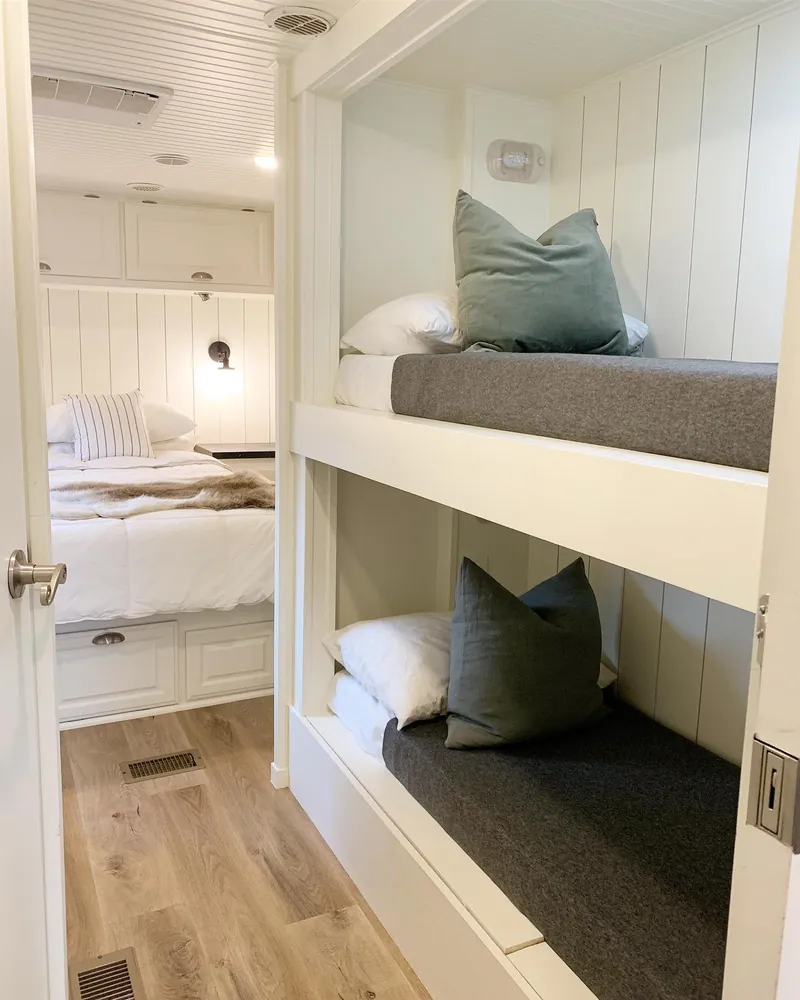
Bunks in older rigs are often plain boxes with flimsy curtains. These were rebuilt with white vertical plank walls, a beadboard ceiling, and a thick white rail along each bed. Gray fitted mattress covers and green velvet pillows make them feel like a cabin nook for kids or guests.
Mattress note: Most bunk mattresses come in odd sizes. Measure the frame and order a custom foam cut, then add a fitted cover in a dark color that hides scuffs.
Safety note: Keep the front rail on the top bunk tall enough to stop a sleeping kid from rolling out. A small wall light, like the one in the top bunk here, saves a lot of bumped heads at night.
7. Make a Before List of Every Dated Detail

Every RV remodel starts with a photo like this one. The kitchen shows the classic dated set: honey oak cabinets, a speckled laminate counter, mottled beige wallpaper, a floral valance, and brown tile floors. Nothing here looks broken, which is good news, because most of it can be painted, covered, or swapped without tearing anything out.
- Walk through and photograph every wall, door, and floor.
- List each item as paint, cover, or replace.
- Price the cheap wins first, like paint, hardware, and light fixtures.
- Save big swaps, like flooring and counters, for last.
Keep this: Check for soft spots and water stains before any pretty upgrades. Paint over a hidden leak and you will be tearing it out next season.
8. Go Cabin Style With Whitewashed Planks and String Lights
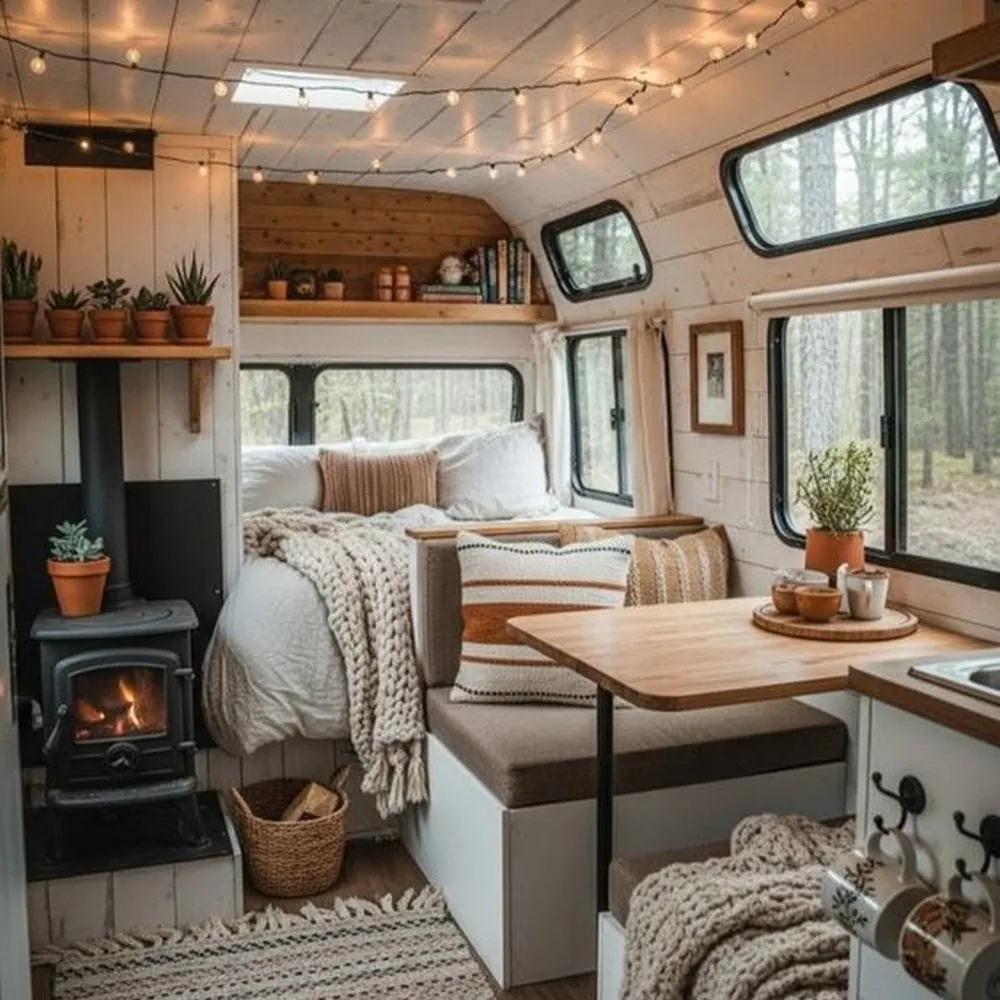
Whitewashed planks cover the walls and ceiling of this little rig, and they make the whole space feel like a lake cabin. The wood grain still shows through the pale finish, so it reads warm instead of stark. A loop of globe string lights along the ceiling gives a soft glow after dark.
Thin plank paneling or peel and stick wood planks work on most RV walls. Brush on thinned white paint, then wipe it back with a rag while it is still wet. Open shelves hold small pots of succulents and books, so add a lip on the front edge to keep things put on the road.
Chunky knit throws, striped pillows, and a fringed rug finish the cozy look. That wood stove is the showpiece, but treat it as a pro job. Stoves in a moving vehicle need proper venting, heat shields, and a working carbon monoxide alarm.
9. Hang Leafy Wallpaper on One Feature Wall
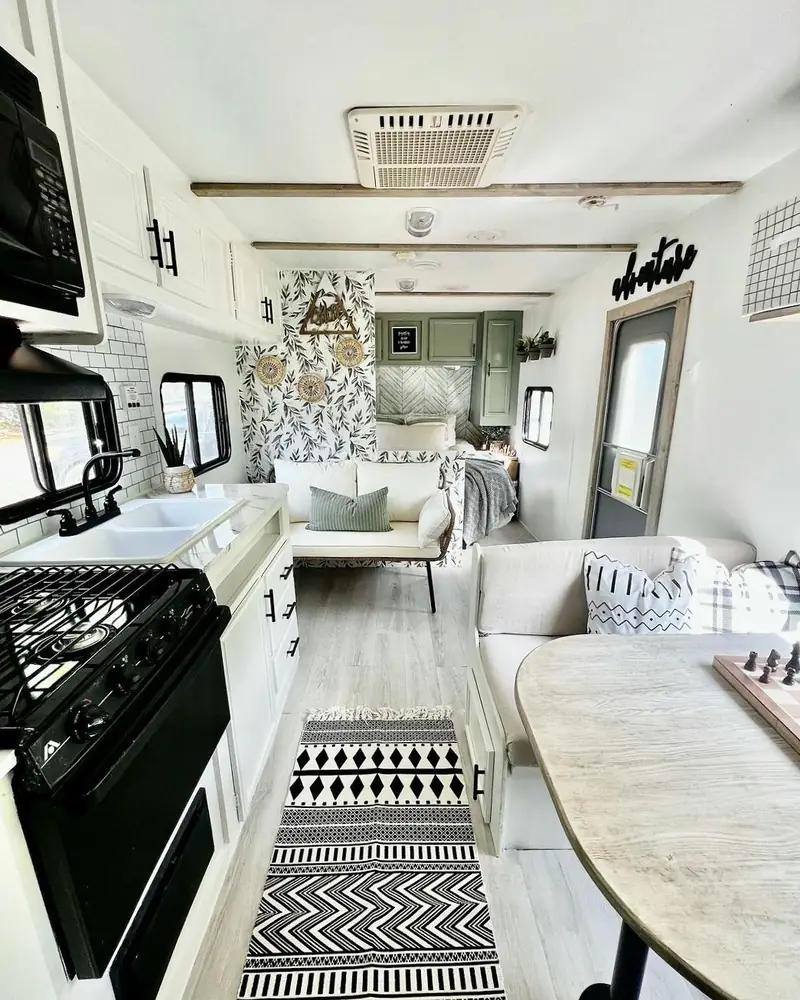
Simple version: a roll or two of peel and stick wallpaper, a smoothing tool, and a sharp blade.
Long, narrow trailers need a place for the eye to land. Here, a leafy black and white wallpaper covers the wall behind the front sofa, right at the end of the main view from the door. It turns a white box into a room with a focal point.
Peel and stick paper suits an RV makeover because it comes off later. Wipe the wall with rubbing alcohol first so the backing grips. RV walls flex as you drive, so press hard along the seams and edges.
Placement note: Keep the pattern to one wall. Everywhere else, this rig stays quiet with white cabinets, black pulls, and a light gray plank floor, so the leaves do the talking.
10. Paint the Galley White and Warm It Up With Wood and Brass
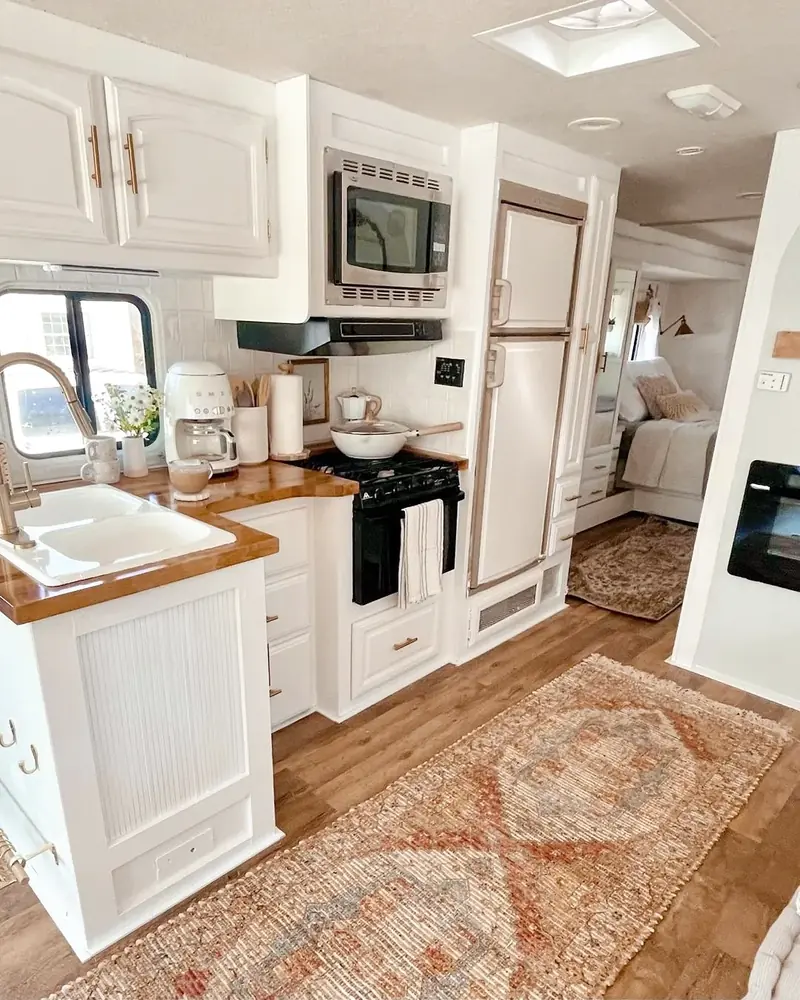
- Paint: crisp white on every cabinet, upper and lower
- Counter: glossy warm wood that wraps around the sink
- Hardware: brass bar pulls and a gold faucet
- Floor: a faded vintage style runner over wood look planks
White paint alone can make an older galley look clean, but it can also feel cold. Warm wood counters and brass hardware fix that. The original arched cabinet doors stayed, and next to fresh paint they look classic instead of dated.
The detail to steal: Look at the end of the sink cabinet. A panel of thin vertical reeds covers it, which gives texture without adding color. Reeded or fluted trim comes in flexible sheets you can cut and glue on.
11. Build a Coffee Bar Around a Mini Fridge
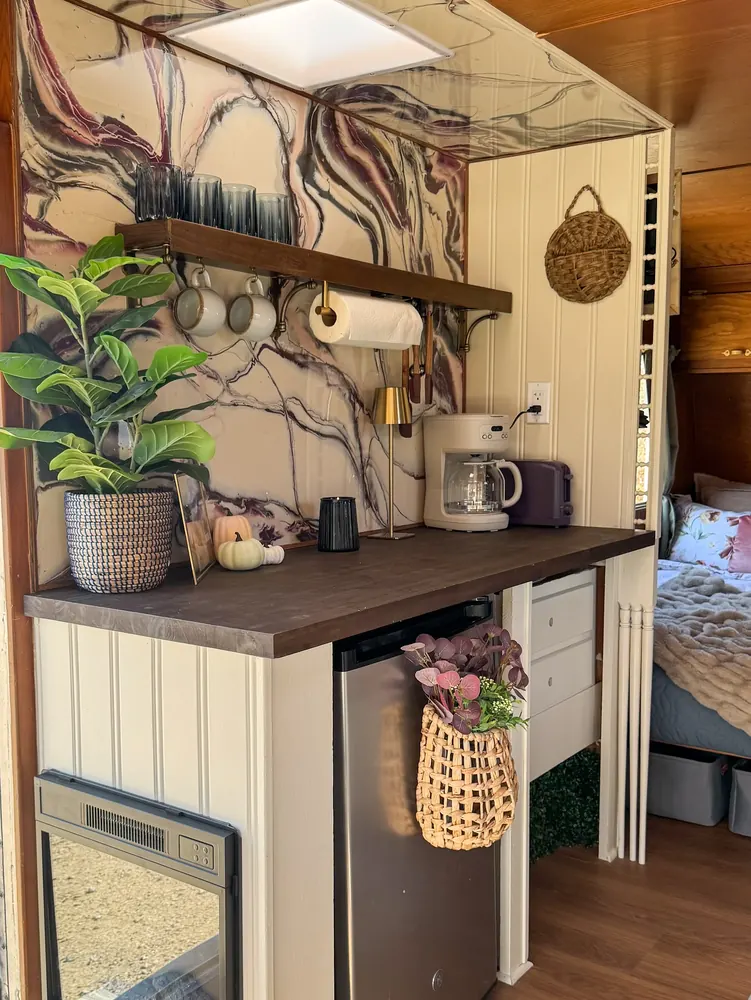
Coffee bars earn their space in a small rig. This one sits on a dark counter over a stainless mini fridge, with a cream beadboard cabinet base and a short drawer stack beside it. Above, a dark wood shelf on metal brackets holds glasses, while mugs and a paper towel roll hang from hooks underneath.
Why it works:
- The fridge tucks under the counter, so no floor space is lost.
- Hooks under the shelf use space that usually sits empty.
- One bold wall, a plum and cream swirl, makes the corner feel special.
Travel tip: Swap glass cups for unbreakable ones before you hit the road, or pack them away. Mugs on open hooks also need a bin or a towel wrap on travel days.
12. Swap the Booth Dinette for a Slim Farmhouse Table
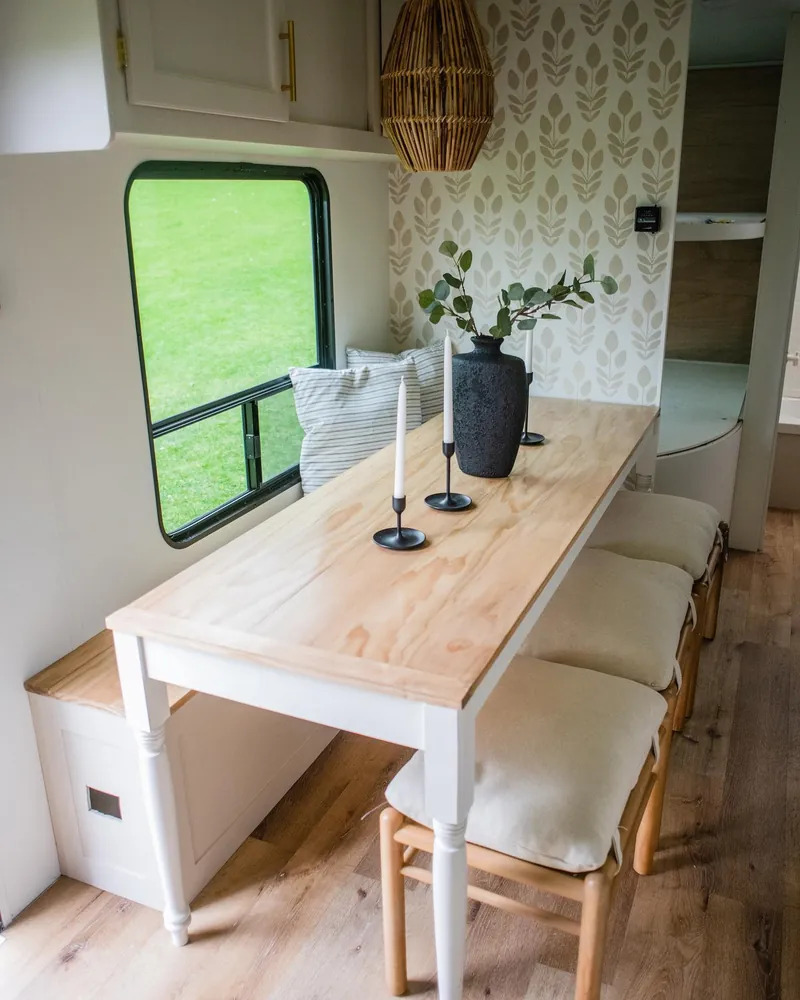
Good fit: couples or small families who eat, work, and play cards at the same table.
Booth dinettes eat a lot of floor space. In this rig, a long, narrow table with white turned legs and a raw pine top runs along the window instead. A storage bench sits under the window on one side, and three wood stools with cream cushions tuck under the other.
Among small space RV remodel ideas, this one frees up a lot of walking room, since the stools slide right under the table. Leaf print wallpaper and a woven pendant make the corner feel like a little cafe.
Thrift swap: Look for an old console or sofa table at a thrift store. Check the height against your stools, paint the base white, and seal the top with a matte clear coat. Bolt it to the wall or floor so it stays put on the road.
13. Trade Bulky Uppers for One Chunky Floating Shelf

Upper cabinets can make a tiny kitchen feel closed in. Here, the wall gets one thick wood shelf on brass brackets, set against white vertical shiplap. It holds bowls, baskets, and rolled towels, and the open wall below lets the window and a small framed print breathe.
Weight note: Screw the brackets into wall studs or framing, not just paneling. RV walls are thin, and a loaded shelf bouncing down the highway needs solid backing.
Paint note: The lower cabinets are a soft greige with brass knobs and a long brass towel bar. That pairing looks warm next to the white walls and marble look counter.
One small change: Frame the window with wide flat trim painted to match the cabinets. Suddenly a plain RV window looks built for the room.
14. Brighten a Dark Bedroom With White Paint and a Drum Shade Light
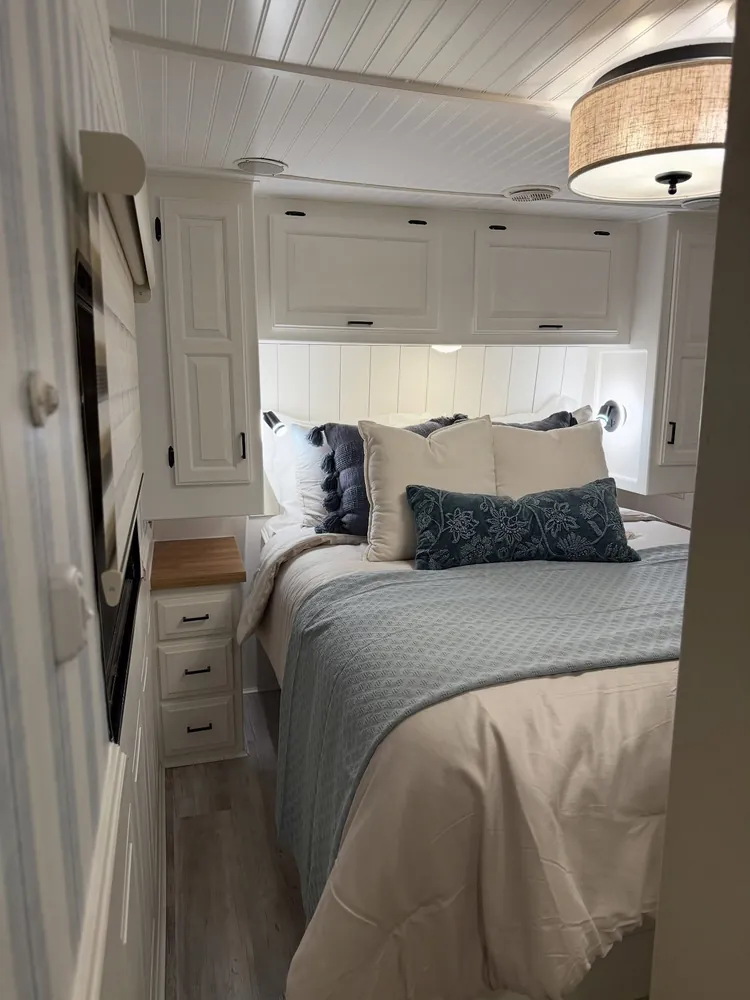
Wood cabinets wrapped around a bed can make a small RV bedroom feel like a cave. Here, every cabinet around and above the bed is painted white, along with a beadboard ceiling and a shiplap panel behind the pillows. Small black pulls keep all that white from looking flat.
The ceiling light is the smart swap. A fabric drum shade fixture hangs where many rigs have a plastic dome, and it spreads a warm, even glow. Two small swing arm reading lights sit on either side of the bed, so nobody needs the big light at night.
Pick a low profile fixture so tall folks do not bump it climbing into bed. Soft blue bedding and a wood topped nightstand finish the calm, coastal look.
15. Add Stained Beams and Brass Lights to a Flat Ceiling

Shopping list: lightweight faux wood beams, a few brass ceiling fixtures, and a quart of deep navy paint.
Flat white ceilings are easy to ignore, and that is the problem. This camper renovation runs dark stained beams across the ceiling and hangs brass multi bulb fixtures between them. At the far end, a navy accent wall frames a small drink shelf and a framed print.
Keep beams light. Hollow faux beams or thin boxed boards weigh little and screw into the roof framing. The stain repeats in the dark wood counter, and the brass picks up the gold faucet and sink, so the whole room feels planned.
Wiring note: RV ceiling lights usually run on 12 volt power. Swap fixtures with the battery disconnected and pick lights made for 12 volt use, or ask an RV tech to help.
16. Add a Drop Leaf to the Kitchen Island
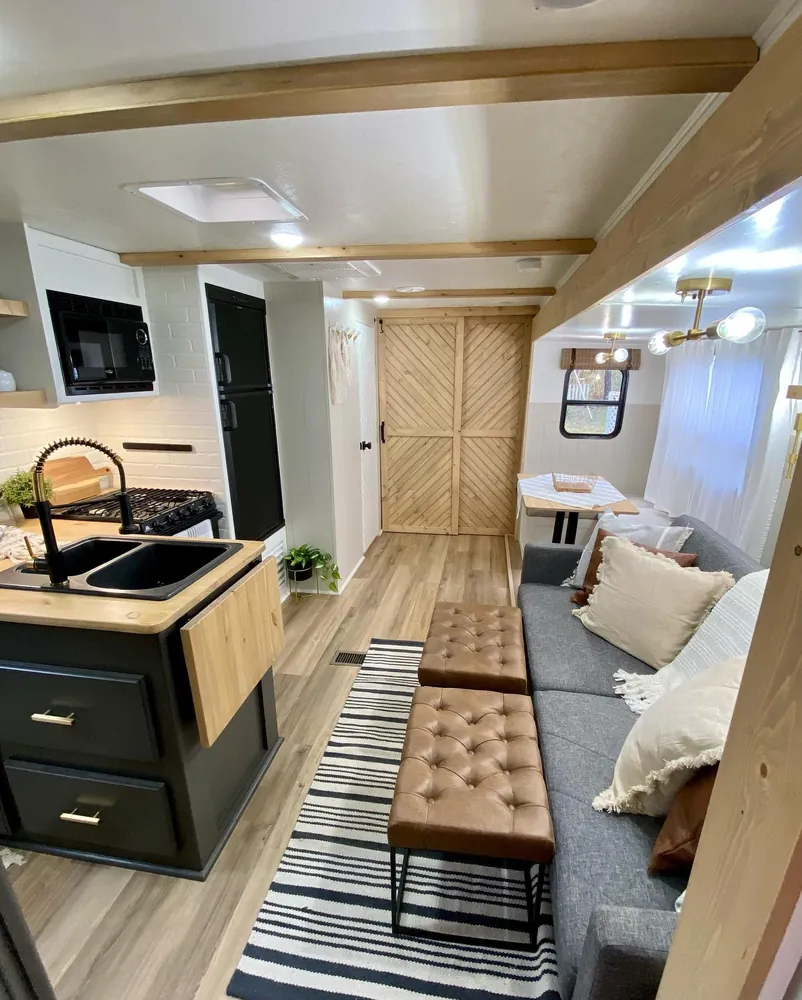
- Base: island cabinets painted a deep charcoal black
- Top: a light butcher block counter
- Extra space: a hinged wood leaf that folds down on the side
- Pulls: simple brass bars
Counter space runs out fast in an RV kitchen. A drop leaf fixes that without taking floor space. Fold it up to chop veggies or set out plates, then let it hang down when you need to walk past. Across the aisle, two tufted leather ottomans and a striped runner keep the living area light and flexible.
Make it easier: Buy a precut butcher block piece and a pair of folding shelf brackets that lock in place. Use brackets rated for real weight, since people lean on counters more than you think.
17. Build a Window Daybed With a Thick Tufted Cushion
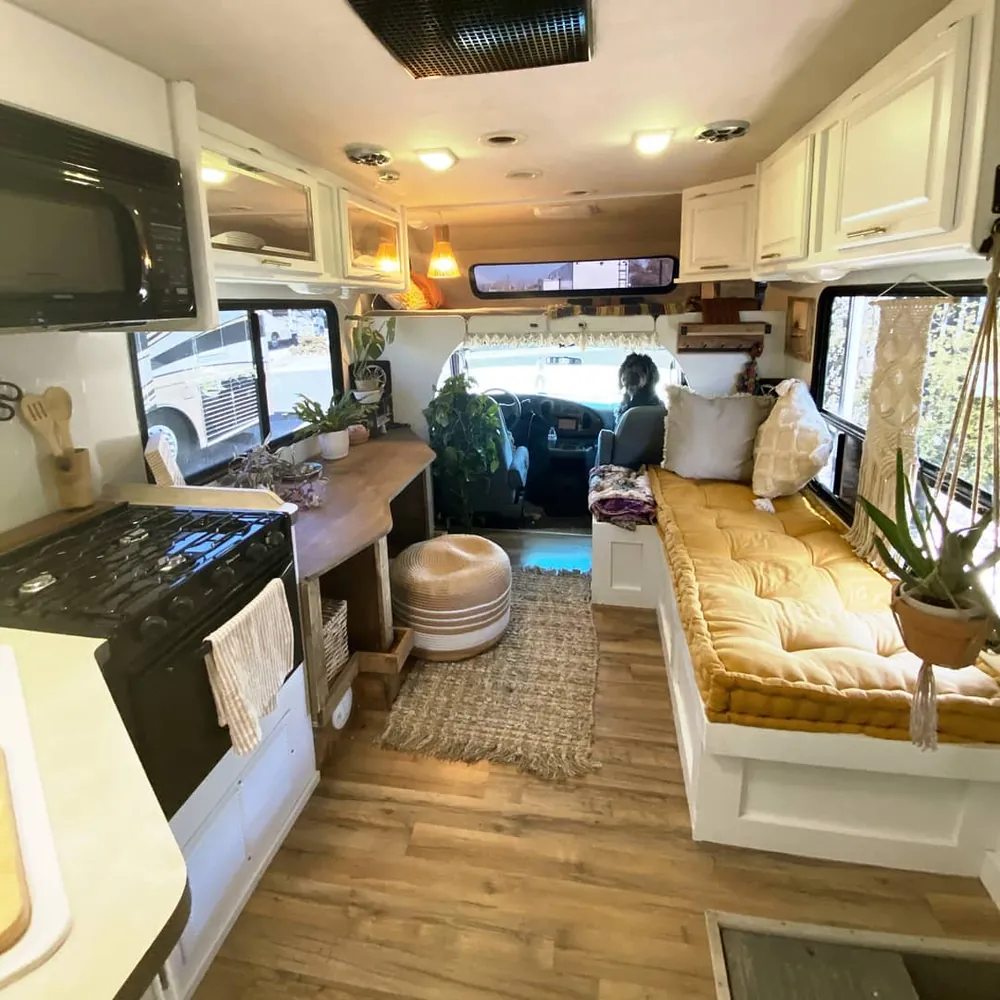
Mustard yellow is the first thing you notice in this motorhome remodel. A white box bench runs under the side windows, topped with a thick tufted cushion that works as a couch by day and a spare bed at night. Across the aisle, a small wood desk, a striped pouf, and a jute rug fill the space near the cab.
Why it works:
- Plywood and basic tools are all it takes to build the box.
- The base can hold lift up lids or drawers for storage.
- One thick cushion is easy to wipe, flip, and keep tidy.
Comfort note: Look for a cushion at least four inches thick if anyone will sleep on it. Add a thin foam topper underneath for guests who stay more than a night.
18. Plank the Wall Behind the Bed and Add Brass Sconces
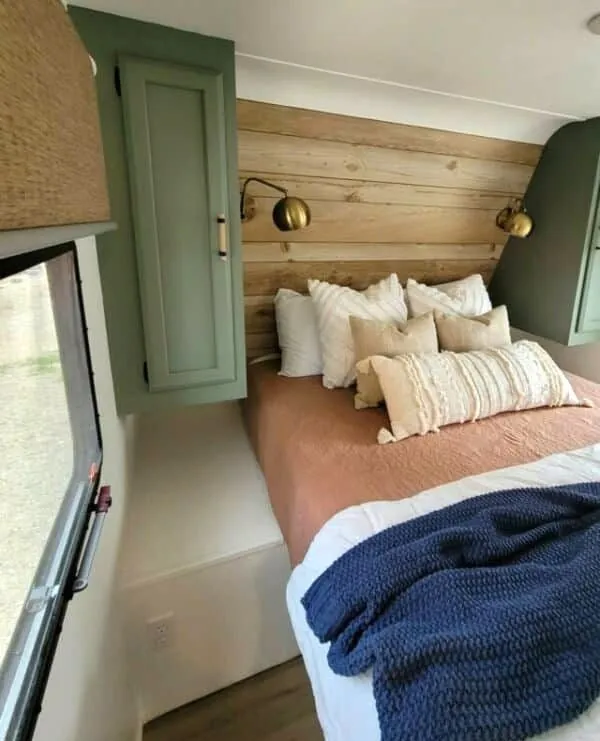
Works best in: small trailer bedrooms where the bed fills the room wall to wall.
Natural wood planks run across the wall behind this bed, and they give the room a headboard without eating any space. Brass swing arm sconces mount right on the boards, one on each side. The cabinets on either side are painted a soft sage green, which looks lovely with the honey wood.
Real boards add weight, so choose thin pine or cedar planks and glue and pin them to the wall. Plug in sconces with a tidy cord cover are the easy route if there is no wiring behind the wall.
Try instead: If wood feels too rustic, paint the planks white and keep the brass lights. Rust bedding and a chunky navy knit throw bring in the color either way.
19. Give a Pop Up Camper a Black and White Refresh

Pop up campers make easy RV remodel projects, since a little fabric goes a long way. This one uses sheer white panels with black tassels at the bed end, white cushion covers, and black and white floral wallpaper on the panel under the bunk. A buffalo check blanket, a black floral rug, and patterned curtains keep the palette tight.
Canvas care: Let sheers and canvas dry fully before you fold the camper down. Damp fabric packed away for even a few days can grow mildew.
Beginner version: Keep the wood cabinets as they are, just like this camper does. The honey wood stays warm next to all the black and white, and it saves a weekend of painting.
20. Paint the Lower Cabinets Sage Green and Hang a Utensil Rail
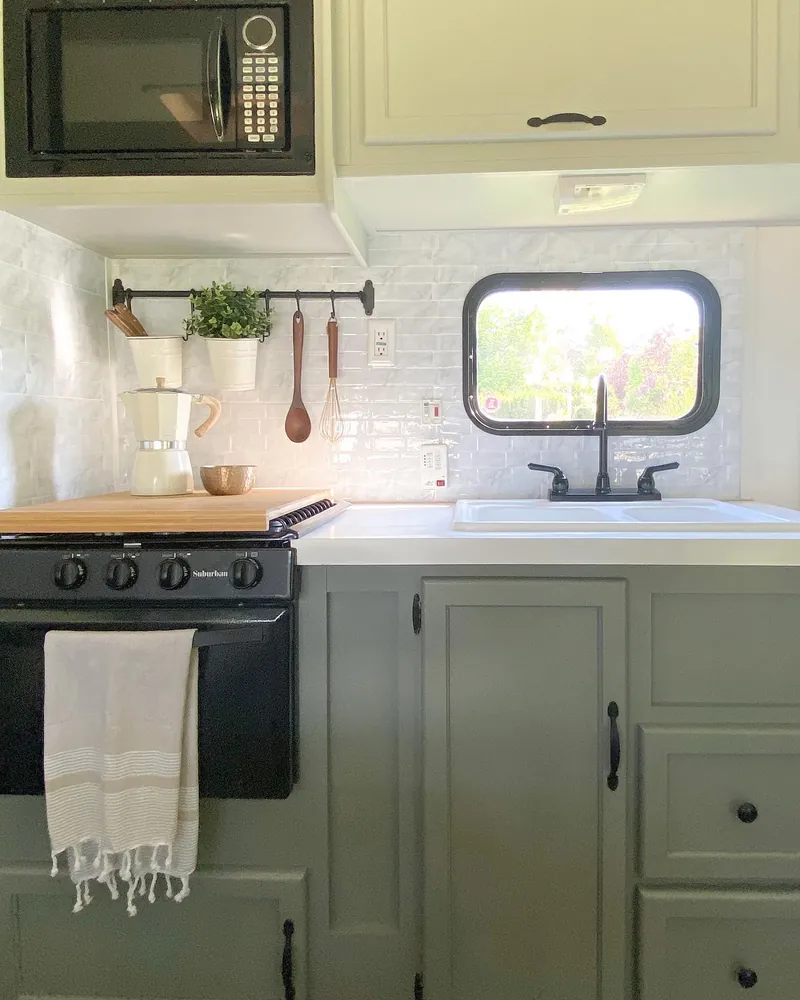
Sage green lower cabinets with matte black pulls turn a tired RV kitchen into something fresh and calm.
White glossy tile on the backsplash bounces light from the window, and a black rail with hooks holds a wooden spoon, a whisk, a small plant, and a cup of utensils. A wood board laid over the stove adds counter space when the burners are off and cool.
- Take off doors and hardware, and label each one.
- Clean with a degreaser, then scuff sand every surface.
- Roll on a bonding primer made for slick surfaces.
- Finish with two thin coats of cabinet enamel.
Care tip: Give the paint a full week to cure before heavy use, even if it feels dry in a day. Soft new paint scratches easily, so stick felt bumpers inside the doors.


